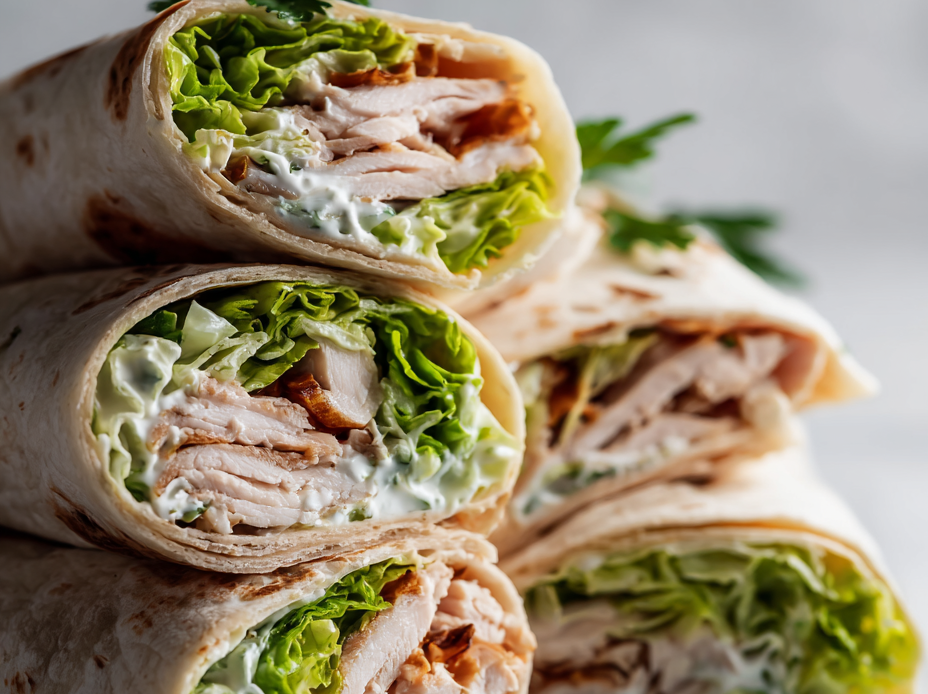
These turkey snack wraps are my go-to for busy mornings. They pack a punch of flavor and are so easy to throw together with leftovers or deli slices. I love how portable they are—perfect for eating on the move without sacrificing taste or texture.
The secret is in the simple, adaptable ingredients—crisp veggies, creamy spreads, and tender turkey—all wrapped up in a soft tortilla. It’s like a little handheld feast that keeps me fueled through hectic days or quick lunch breaks.
What makes these wraps special is how they turn everyday ingredients into something satisfying and fuss-free. No need for fancy tools or long prep—just quick assembly and they’re ready to go, no matter how tight the schedule.
Focusing on how these wraps serve as a quick, portable lunch for busy mornings, turning simple leftovers into a satisfying, no-fuss meal that can be eaten on the go without losing flavor or texture.
The story behind this recipe
- This recipe came from a messy weekend where I wanted something quick, satisfying, but still fresh tasting. I had leftover turkey, some crunchy veggies, and a soft tortilla hanging around, and suddenly, a snack wrap was born. It’s one of those dishes that’s so simple but feels like a little treat every time.
- I remember the first time I made these for a picnic—everyone loved how they held up in the heat and still tasted bright. Now, I keep the ingredients stocked just for these moments when I need something fast but not boring. It’s like a little reminder that good food doesn’t need to be complicated or fancy.
- heading: ‘The story behind this recipe’
Key Ingredient Tips
- Turkey slices: I prefer roasted, flavorful slices that still have some juiciness. Try to avoid overly lean options if you want a tender bite.
- Tortillas: Soft flour tortillas are my go-to—they fold nicely and hold everything together. Whole wheat adds a nutty flavor, but white works perfectly.
- Veggie crunch: Crisp lettuce or shredded carrots give a satisfying bite. Keep them chilled for extra freshness and crunch.
- Creamy spread: A good smear of mayo or Greek yogurt ties everything together. For a zing, add a squeeze of lemon or a pinch of black pepper.
- Cheese: A slice of Swiss or cheddar melts slightly and adds richness. If you want dairy-free, skip it or use a plant-based alternative.
- Extras: A few pickles or sliced bell peppers can add a nice tang or sweetness. Use what you’ve got—improvisation is key.
- Seasonings: A tiny dash of paprika or garlic powder on the turkey can elevate the flavor. Don’t overdo it—just a whisper of spice.
Spotlight on key ingredients
Turkey slices:
- I prefer roasted, flavorful slices that still have some juiciness. Try to avoid overly lean options if you want a tender bite.
- Tortillas: Soft flour tortillas are my go-to—they fold nicely and hold everything together. Whole wheat adds a nutty flavor, but white works perfectly.
- Veggie crunch: Crisp lettuce or shredded carrots give a satisfying bite. Keep them chilled for extra freshness and crunch.
Creamy spread and cheese:
- Creamy spread: A good smear of mayo or Greek yogurt ties everything together. For a zing, add a squeeze of lemon or a pinch of black pepper.
- Cheese: A slice of Swiss or cheddar melts slightly and adds richness. If you want dairy-free, skip it or use a plant-based alternative.
Notes for ingredient swaps
- Dairy-Free: Swap mayo for hummus or avocado spread. It adds creaminess but shifts the flavor slightly.
- Gluten-Free: Use corn or lettuce wraps instead of flour tortillas. Expect a different texture, more fragile and less chewy.
- Low-Sodium: Choose unsalted turkey slices and skip added salt in spreads. The wrap will taste fresher and less salty.
- Vegan: Replace turkey with marinated tofu strips or tempeh. Use vegan cheese or omit for a completely plant-based version.
- Spicy Kick: Add hot sauce or sliced jalapeños to the spread. It gives a fiery punch and brightens the overall taste.
Equipment & Tools
- Non-stick skillet: Warm tortillas evenly without sticking or tearing.
- Butter knife or spatula: Spread spreads smoothly and help in rolling.
- Sharp knife: Cut the wraps cleanly without squishing the filling.
Step-by-step guide to Turkey Snack Wraps
- Equipment & Tools: Gather a non-stick skillet (medium heat), a butter knife or spatula (for spreading), and a sharp knife (for slicing).
- Warm the tortillas: Wrap them in a damp towel and microwave for 20 seconds until pliable, or warm in a dry skillet on low heat for 30 seconds per side.
- Prepare the filling: Lay out sliced turkey, shredded lettuce, sliced tomatoes, and your preferred spread on a plate for easy assembly.
- Spread the base: Use the butter knife to spread a thin layer of mayo or Greek yogurt over the center of each tortilla, leaving about 1 inch border.
- Layer the ingredients: Place slices of turkey in the middle, followed by veggies and cheese if using. Keep it tidy for easier rolling.
- Roll it up: Fold the sides inward, then roll tightly from one edge to the other, pressing gently to seal the wrap.
- Cut and serve: Use a sharp knife to slice each wrap in half diagonally. Serve immediately or wrap in foil for on-the-go munching.
- Resting & Finishing: Let the wraps sit for a minute to settle, then serve on a plate or pack for lunch. For best freshness, consume within 2 hours.
- Checkpoints & How to Know It’s Done: The wraps should be evenly filled and tightly rolled, with the filling warm but not spilling out, and the outside golden if lightly toasted.
Let the wraps rest for a minute to settle the filling. Slice in half diagonally, arrange on a plate, and enjoy immediately or pack for later. Wrap in foil if taking on the go.
How to Know It’s Done
- The tortillas are pliable and warm, with no cracks when rolled.
- Filling is evenly distributed and snug inside the wrap.
- The outside is lightly golden or the filling is warmed through, ready to eat.
Turkey Snack Wraps
Ingredients
Equipment
Method
- Gather all your ingredients: tortillas, turkey slices, shredded lettuce, tomato slices, spread, and cheese.
- Wrap each tortilla in a damp towel and microwave for about 20 seconds until warm and pliable. This makes them easier to roll without cracking.
- Lay a warm tortilla flat on a clean surface. Use a butter knife or spatula to spread a thin layer of mayonnaise or Greek yogurt over the center, leaving about an inch border around the edges.
- Place 2 slices of turkey in the middle of the tortilla, overlapping slightly for a full, juicy filling.
- Add a handful of shredded lettuce and a few tomato slices over the turkey for crunch and freshness.
- If using cheese, layer a slice on top of the veggies, allowing it to melt slightly against the warm fillings.
- Fold the sides of the tortilla inward, then roll tightly from one edge to the other, pressing gently to seal the wrap and keep everything contained.
- Use a sharp knife to cut the wrap in half diagonally for a neat presentation, revealing the layers inside.
- Repeat the process with remaining tortillas and fillings until all wraps are assembled.
- Serve immediately for best freshness and crunch, or wrap in foil for an easy on-the-go lunch.
Pro tips for perfect wraps
- Use a slightly damp towel to warm tortillas—keeps them pliable and easy to roll.
- Spread spreads evenly—leave a 1-inch border to prevent overflow when rolling.
- Layer ingredients snugly—less stuffing makes for tighter, neater wraps.
- Roll firmly but gently—press to seal, avoiding squeezing out the filling.
- For a warm finish, briefly toast the wrapped tortillas in a skillet—crisp outside, warm inside.
- Let the wraps rest for a minute—this helps settle the fillings and makes slicing cleaner.
- Use a sharp knife to cut—press down firmly and saw through for clean halves.
Common mistakes and how to fix them
- FORGOT to check tortilla warmth → Do so to prevent tearing during rolling.
- DUMPED filling or overstuffed → Keep fillings moderate for easy rolling and neat wraps.
- OVER-TORCHED the outside → Aim for light golden color, not dark or burnt.
- MISSED resting time → Let the wraps sit for a minute to settle and avoid spilling.
Fast Fixes for Wrap Woes
- When tortillas crack, splash a little water on them and rewarm briefly to soften.
- If filling spills out, patch with a bit more spread and re-roll tightly.
- Over-torched wraps? Shield with a damp paper towel and finish gently in a lower heat.
- Forgot to let the wrap rest? Splash a tiny bit of water on the outside, then microwave 5 seconds.
- Dried out filling? Use a quick spray of water and reheat to revive moisture.
Prep, store, and reheat tips
- Prepare the fillings and assemble the wraps ahead of time; keep ingredients separate to maintain freshness and crunch.
- Wrap completed wraps tightly in plastic wrap or foil; store in the fridge for up to 24 hours without losing texture.
- For best flavor, consume within 24 hours; the tortilla may soften slightly, but flavors stay bright and satisfying.
- Reheat by gently warming in a skillet over low heat for 1-2 minutes per side, or in the microwave for 20-30 seconds, until just warmed and fragrant.
Top questions about Turkey Snack Wraps
1. Can I use deli turkey slices?
Use sliced turkey or leftover roasted turkey for best flavor. It’s juicy and tender, filling the wrap nicely.
2. What kind of tortillas work best?
Whole wheat tortillas add a nutty flavor and are slightly denser. White flour tortillas are softer and milder.
3. How do I keep the veggies crunchy?
Chill crunchy veggies like lettuce and carrots before assembly to keep the wraps crisp and fresh.
4. Can I make the spread dairy-free?
Greek yogurt adds a tangy creaminess, while mayo is richer. Both work well, depending on your preference.
5. How long do leftovers last?
Wraps are best eaten fresh but can be stored in the fridge for up to 24 hours. Reheat briefly in a skillet for softness.
6. How do I cut the wraps neatly?
Use a sharp knife for clean cuts. A sawing motion helps prevent squishing the filling and keeps the wrap tidy.
7. What other fillings can I add?
Adding sliced pickles or bell peppers gives a tangy or sweet crunch. Feel free to improvise with what you have.
8. How do I warm the tortillas properly?
Warm the tortillas in a damp towel in the microwave for 20 seconds or in a skillet for 30 seconds for easy rolling.
9. What if my tortilla cracks when I roll?
If the wrap cracks, splash a little water on it and rewarm briefly to soften before rolling again.
10. What if my wrap falls apart?
For a quick fix, patch over spills with extra spread and re-roll tightly. Keep fillings moderate for best results.
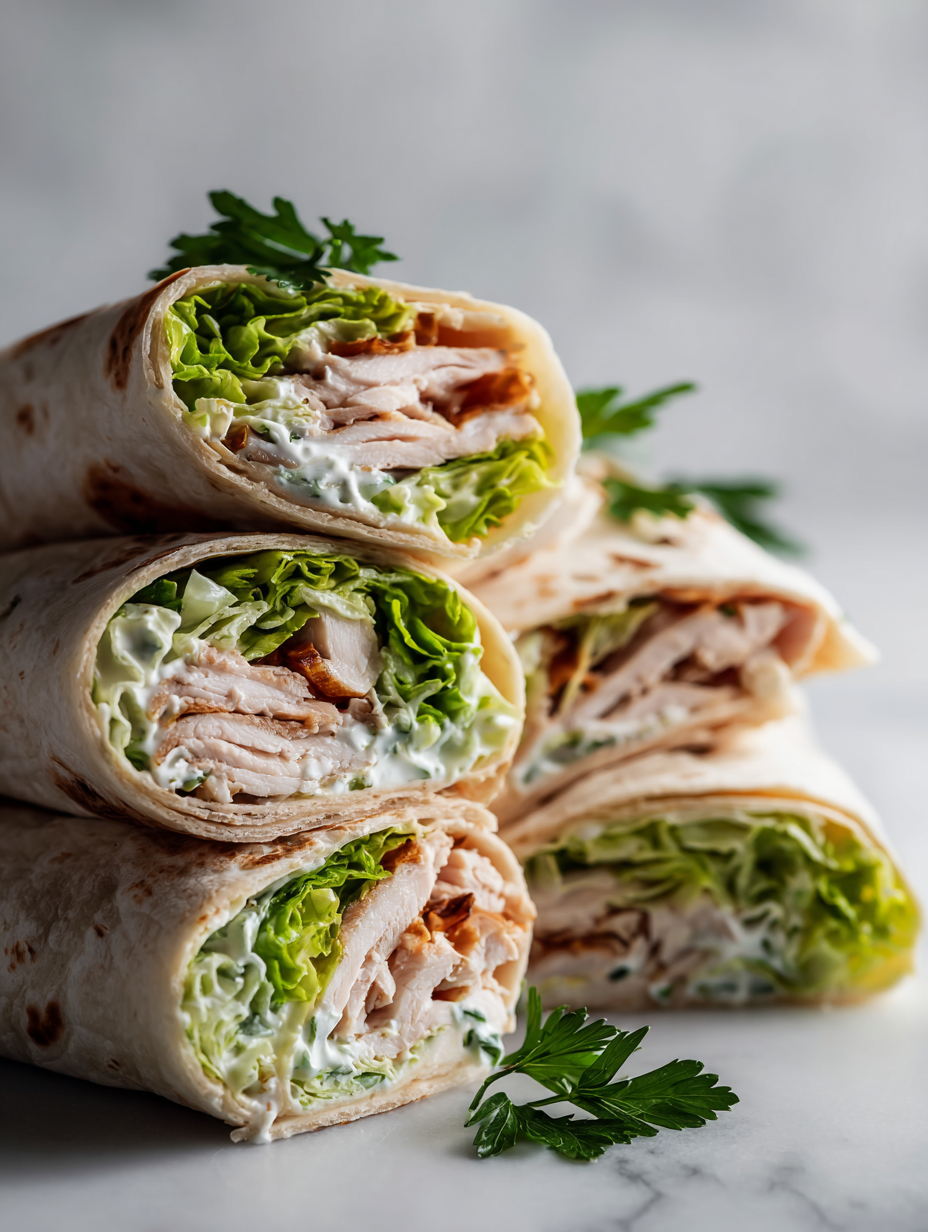
These turkey snack wraps are a real lifesaver on hectic mornings, bringing together familiar flavors in a portable form. There’s something satisfying about the crunch of fresh veggies paired with tender turkey and a hint of creamy spread, all wrapped up in a soft tortilla. They remind me that good, quick bites don’t have to be complicated or boring.
Whenever I make these, I appreciate how simple ingredients can turn into a satisfying meal in minutes. It’s a little reminder that practicality and comfort can go hand in hand—perfect for busy days or when I just want something familiar and easy to grab.
Hi, I’m Madison Greene, the voice and creator behind Texture Obsessed. Born and raised in the United States, I’ve always believed that food is more than just flavor — it’s about the way it feels.


