This recipe is all about giving chicken breasts the respect they deserve. Too often, they’re grilled and served, then quickly forgotten—dry, dull, forgettable. But when you slow down, when you give them a proper rest, that’s when they really shine, juicy and full of flavor, almost like they’re still alive on the grill.
I learned this the hard way, standing over a hot grill, frustrated by tough, rubbery chicken. It wasn’t until I started resting my breasts—really resting them—that I finally cracked the code. Now, it’s become this quiet, almost meditative part of the process, turning a simple dinner into a mindful ritual.
Focusing on the overlooked importance of resting grilled chicken breasts, this recipe emphasizes how proper downtime enhances juiciness and flavor, transforming a simple grill session into a mindful, almost meditative cooking ritual.
The overlooked art of resting chicken
- Grilling chicken has always been a bit chaotic for me, but resting it properly changed everything—juicy bites, no more rubbery surprises.
- There’s a quiet pride in mastering the simple act of resting chicken—feels like I’ve unlocked a secret to perfect flavor.
- I used to rush through grilling, but now I savor the process, especially the smell of smoky chicken resting on the cutting board.
- When I finally got the timing right for resting, I felt a small victory—like I’d finally cracked the code for juicy, flavorful chicken.
The story behind this recipe
- This recipe came about after a summer camping trip where I forgot to marinate the chicken but still wanted something flavorful and simple to cook over the fire. I realized that a good marinade isn’t the only way to make chicken pop with flavor; sometimes, just a quick salt and pepper rub, combined with the smoky grill, does the trick.
- Ever since those nights under the stars, I’ve been obsessed with how straightforward grilled chicken can be magic—no fuss, just real, honest flavors. It reminds me that great food doesn’t need complicated ingredients, just a little patience and attention to detail.
- heading: The simplicity that stuck with me
Historical and cultural notes
- The practice of grilling chicken dates back thousands of years, with roots in ancient civilizations that prized open-flame cooking.
- Native tribes in North America often used wood fires to impart smoky flavors, a technique still central to modern grilling.
- The term ‘barbecue’ originally referred to slow-cooking meat over smoke, but now includes quick grilling methods like this one.
- Chicken became a popular grilling choice in the 20th century as backyard barbecues grew in popularity post-World War II.
- This recipe emphasizes resting chicken, a technique that modern chefs have championed to maximize juiciness and flavor.
Ingredient breakdown: key components
- Chicken breast: I look for breasts that feel firm and have a bit of give—freshness shows in the texture, not just the sell-by date. You want a juicy, tender result, so don’t overdo it with the marinate or seasoning—keep it simple and let the grill do the work.
- Olive oil: I brush on a light coating to prevent sticking and help the seasoning adhere. If you prefer a richer flavor, swap to avocado oil—just watch the smoke point. The oil should shimmer slightly when you start grilling.
- Lemon: I like bright, zesty lemon juice to cut through the richness. Squeeze fresh for that sharp, zingy scent—avoid bottled stuff if you can. It brightens the meat and makes every bite pop with freshness.
- Salt and pepper: I season generously but evenly—don’t be shy with the salt; it’s key to developing flavor. Use freshly cracked black pepper for a bit of spice and aroma that’s more vivid than pre-ground. Adjust to your taste but aim for balanced seasoning.
- Herbs (like thyme or rosemary): I choose fresh herbs for a burst of earthy aroma. A quick chop and sprinkle before grilling releases their oils—smoke and herbs together create a layered, fragrant crust. Dried herbs can work, but fresh is brighter.
- Optional marinade (like garlic + herbs): I sometimes marinate for 30 minutes, but I prefer a quick dry rub. If you want more flavor, add a splash of soy or a dash of honey—just be aware of sugar’s tendency to burn if overexposed to high heat.
- Cooking spray (if needed): I keep a spray handy to prevent sticking if I’m grilling on particularly sticky surfaces. A light spray right before placing the chicken helps keep things moving smoothly and prevents tears or tears in the meat.
Spotlight on key ingredients
Chicken breast:
- I look for breasts that feel firm and have a bit of give—freshness shows in the texture, not just the sell-by date. You want a juicy, tender result, so don’t overdo it with the marinate or seasoning—keep it simple and let the grill do the work.
- Olive oil: I brush on a light coating to prevent sticking and help the seasoning adhere. If you prefer a richer flavor, swap to avocado oil—just watch the smoke point. The oil should shimmer slightly when you start grilling.
- Lemon: I like bright, zesty lemon juice to cut through the richness. Squeeze fresh for that sharp, zingy scent—avoid bottled stuff if you can. It brightens the meat and makes every bite pop with freshness.
Herbs and seasonings:
- Herbs (like thyme or rosemary): I choose fresh herbs for a burst of earthy aroma. A quick chop and sprinkle before grilling releases their oils—smoke and herbs together create a layered, fragrant crust. Dried herbs can work, but fresh is brighter.
- Salt and pepper: I season generously but evenly—don’t be shy with the salt; it’s key to developing flavor. Use freshly cracked black pepper for a bit of spice and aroma that’s more vivid than pre-ground. Adjust to your taste but aim for balanced seasoning.
Ingredient swaps and useful tips
- Dairy-Free: Skip butter or creamy marinades; use olive oil plus lemon for bright, clean flavor.
- Low-Sodium: Use salt-reduced seasoning blends; enhance flavor with herbs and citrus instead of salt.
- Herb Variations: Swap thyme or rosemary for sage or oregano to change aroma and taste profile.
- Oil Choices: Replace olive oil with avocado or grapeseed oil for higher smoke points and milder flavor.
- Acid Alternatives: Use lime juice or vinegar instead of lemon for a different citrus brightness.
- Sweeteners: Add a touch of honey or maple syrup to marinade for a subtle sweet contrast to smoky char.
- Spice Level: Incorporate chili powder or cayenne for heat, or skip for a milder, family-friendly version.
Equipment & Tools
- Heavy-duty grill or cast-iron pan: Provides even heat and good sear for crispy surface.
- Tongs: Turns and handles the chicken gently.
- Meat thermometer: Checks internal temperature for doneness.
- Plate and foil: Rest the chicken and keep it warm.
Step-by-step guide to grilling chicken
- Equipment & Tools: Get a heavy-duty grill or cast-iron grill pan—this helps with even heat and good sear. Have tongs, a meat thermometer, and a clean plate ready.
- Prep the chicken: Pat breasts dry with paper towels. Lightly score the thicker side to help even cooking. Season generously with salt, pepper, and a drizzle of olive oil.
- Preheat the grill: Heat to medium-high, about 200-230°C (390-450°F). Aim for a consistent, hot surface—this creates that smoky crust.
- Grill first side: Place chicken on the grill, presentation side down. Cook for 5-6 minutes—look for deep grill marks and a slight char on the edges. Do not move it too soon.
- Flip and cook second side: Turn the breasts over gently with tongs. Grill for another 5-6 minutes. Check for a golden crust and a slight jiggle in the middle—don’t overcook.
- Internal temp check: Insert a meat thermometer into the thickest part. Remove once it hits 74°C (165°F). If it’s not there yet, close the lid and cook a minute longer.
- Rest the chicken: Transfer to a plate, cover loosely with foil, and let rest for 5 minutes. This allows juices to redistribute and keeps the meat tender.
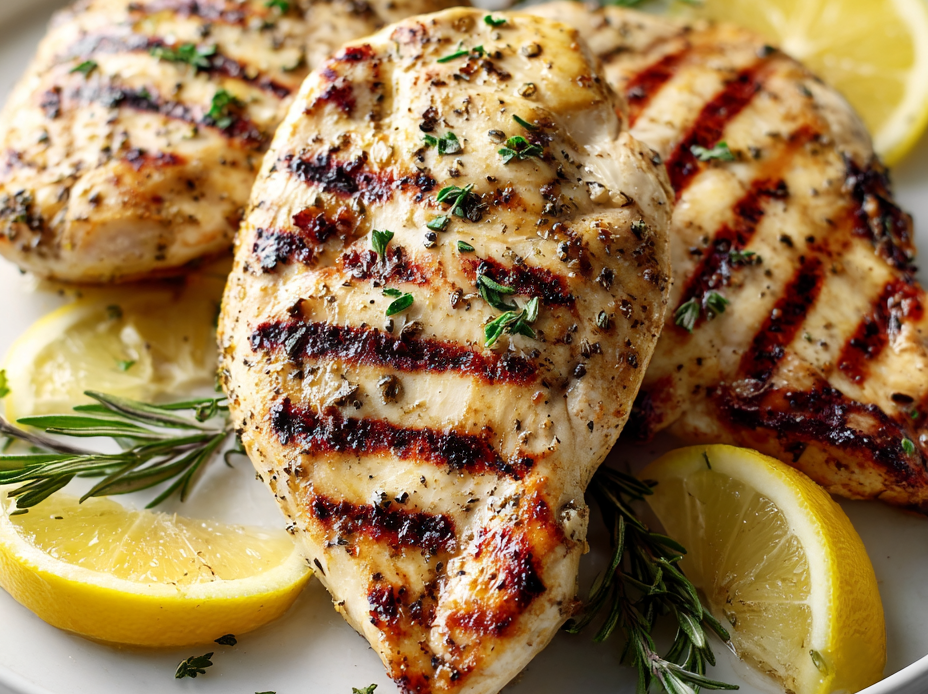
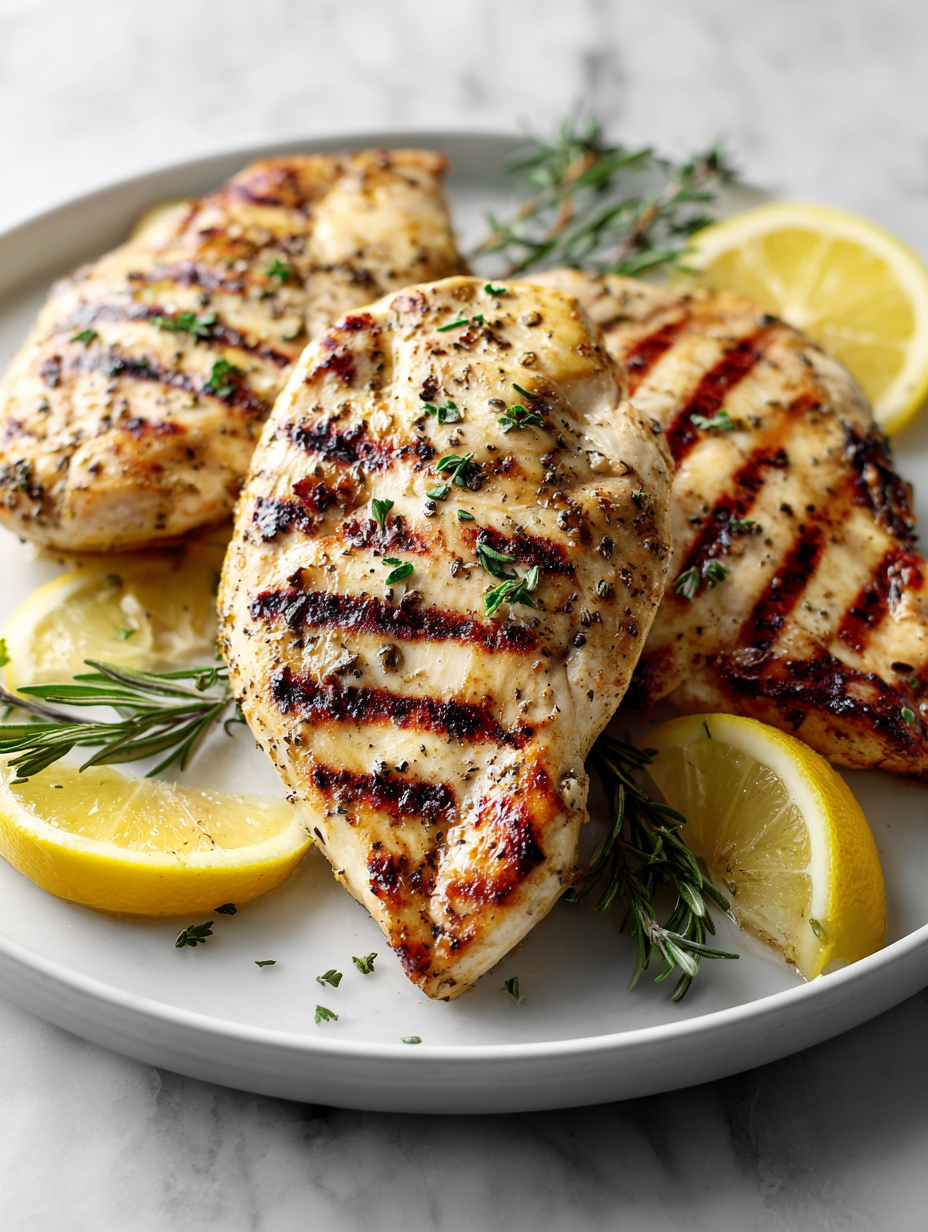
- Final check: The chicken should be juicy, with a firm but tender texture. The surface should look caramelized, with a smoky aroma lingering.
- Serve: Slice against the grain, plate, and enjoy the rich, smoky flavor with a slightly juicy bite. Perfect for salads or simple sides.
Transfer the chicken to a clean plate, loosely tent with foil, and rest for 5 minutes. Slice against the grain and serve immediately, enjoying the juiciness and smoky aroma.
How to Know It’s Done
- Deep golden grill marks with caramelized edges.
- Internal temperature reaches 74°C (165°F).
- Juices run clear when pierced, with slight jiggle in the middle.
Rested Grilled Chicken Breasts
Ingredients
Equipment
Method
- Pat the chicken breasts dry with paper towels, then lightly score the thick side with a sharp knife to promote even cooking.
- In a small bowl, whisk together olive oil, fresh lemon juice, salt, and pepper. Brush this mixture generously over both sides of each chicken breast.
- Preheat your grill or cast-iron pan over medium-high heat until it shimmers and is hot to the touch, about 200-230°C (390-450°F).
- Place the chicken breasts on the grill, presentation side down, and cook for 5-6 minutes until deep grill marks and a golden crust form.
- Flip the chicken breasts carefully using tongs, then cook for another 5-6 minutes, ensuring even searing and listening for a gentle sizzle.
- Insert a meat thermometer into the thickest part of each breast; once it reads 74°C (165°F), remove the chicken from the grill.
- Transfer the grilled chicken to a plate, loosely cover with foil, and let rest for 5 minutes to allow juices to redistribute.
- Uncover and check that the juices run clear and the meat feels tender but firm. Slice against the grain for serving.
- Serve the juicy, smoky chicken breasts with your favorite sides, enjoying the crispy crust and tender interior.
Tips and tricks for perfect grilled chicken
- Bolded Mini-Head: Oil brushings → Lightly coat the chicken to prevent sticking and aid seasoning adhesion.
- Bolded Mini-Head: Hot grill → Preheat to medium-high until the surface shimmers, ensuring a good sear.
- Bolded Mini-Head: Timing is everything → Cook each side for 5-6 minutes, aiming for deep grill marks and a slight char.
- Bolded Mini-Head: Temp check → Use a meat thermometer to reach 74°C (165°F) in the thickest part for safety and juiciness.
- Bolded Mini-Head: Rest properly → Cover loosely and rest for 5 minutes to let juices redistribute, keeping the meat tender.
- Bolded Mini-Head: Visual cues → Look for a golden crust, caramelized edges, and juices running clear as signs of doneness.
- Bolded Mini-Head: Avoid overcooking → If the chicken starts to dry out, remove from heat early and cover to keep moist.
Common mistakes and how to fix them
- FORGOT to monitor internal temp → Use a reliable meat thermometer.
- DUMPED the chicken too early → Rest chicken for 5 minutes for juiciness.
- OVER-TORCHED the surface → Lower heat or move chicken to cooler part of grill.
- UNDER-SEASONED the meat → Be generous with salt and pepper for flavor.
Quick fixes and pantry swaps
- When chicken sticks, splash with a bit of oil or water to loosen it.
- If overcooked, patch with a dab of butter or broth to restore moisture.
- Dumped the chicken early? Rest it for 5 minutes before slicing.
- When the grill flares up, shield chicken with a foil tent to prevent charring.
- Pan is smoky? Swap to a different type of oil with a higher smoke point.
Prep, store, and reheat tips
- Marinate the chicken breasts up to 2 hours ahead in the fridge—this enhances flavor and keeps the meat juicy. The aroma of garlic and herbs will intensify overnight.
- Prepare your seasoning and oil mixture in advance; store in an airtight container for quick assembly before grilling. It saves time and ensures even coverage.
- Cooked grilled chicken can be refrigerated for up to 3 days. Wrap tightly or store in an airtight container to keep it moist and prevent odors from seeping in.
- Reheat gently in a skillet over low heat or in the oven at 150°C (300°F) for 10–15 minutes, until warm. The meat will stay tender, but avoid overheating to prevent dryness.
- For the best flavor, serve the reheated chicken soon after warming. Expect a slightly less smoky aroma but still juicy, with a gentle hint of char.
Top questions about grilled chicken
1. How do I know when the chicken is cooked through?
Use a meat thermometer to ensure the thickest part hits 74°C (165°F). It keeps the chicken juicy and safe.
2. Why is resting important after grilling?
Let the chicken rest loosely covered with foil for about 5 minutes. It lets the juices redistribute, making it tender and moist.
3. How hot should my grill be for perfect chicken?
Preheat your grill to medium-high until it shimmers, around 200-230°C (390-450°F). It creates a good sear and smoky flavor.
4. How much seasoning do I need for good flavor?
Season the chicken generously with salt, pepper, and a light brush of oil before grilling for maximum flavor.
5. Should I use fresh or dried herbs for seasoning?
Use fresh herbs like thyme or rosemary for a fragrant crust. Dried herbs work, but fresh is brighter and more aromatic.
6. What if the chicken sticks to the grill?
If the chicken sticks, spray with a bit of oil or water to loosen it. Keep a spray bottle nearby for quick fixes.
7. How do I reheat grilled chicken without drying it out?
Reheat in a low oven or skillet, covered, around 150°C (300°F) for 10-15 minutes. Expect juicy, slightly smoky leftovers.
8. How can I prevent overcooking the chicken?
Avoid overcooking by checking the internal temp early. If it reaches 74°C (165°F), remove it from heat immediately.
9. My chicken is dry—what’s a quick fix?
For a quick fix if the chicken is dry, brush with a little broth or melted butter before serving.
10. What equipment do I need for grilling chicken?
Use a sturdy grill or cast-iron pan for even heat and good sear. Tongs help turn the chicken gently without tearing.
Resting the chicken after grilling isn’t just a step—it’s the quiet pause that seals in all the smoky, salty goodness. That moment of patience transforms a simple piece of meat into something that feels almost deliberate, almost mindful. It’s these small acts that make the everyday feel a little more intentional.
In the end, this recipe isn’t about perfection but about connection—between heat, ingredients, and time. It’s about embracing the messy, flavorful process and trusting that a little patience yields juicy, satisfying results. Sometimes, the best part of cooking is simply knowing you’ve done your best and enjoyed every bite along the way.
Hi, I’m Madison Greene, the voice and creator behind Texture Obsessed. Born and raised in the United States, I’ve always believed that food is more than just flavor — it’s about the way it feels.


