This paneer snack plate started as a way to make something quick but turned into a little art project. I love how you can really make it your own, playing with flavors, textures, and seasonality. It’s like a small canvas that invites you to experiment and express yourself without fuss.
For me, it’s about turning a humble ingredient into a colorful, satisfying spread that feels special but is still easy enough to whip up on a weeknight. The best part? It’s endlessly adaptable—whether I want bold spices or just a simple, fresh bite, I can craft it to match my mood. It’s my go-to for when I crave something vibrant and personal.
Focusing on how a simple paneer snack plate can serve as a canvas for flavor exploration and personal expression, turning an everyday ingredient into a vibrant, customizable feast that reflects mood and season.
The story behind this recipe
One rainy afternoon, I found myself craving something savory and easy, but with a little twist. I opened the fridge and saw a block of paneer, and suddenly it hit me—why not turn it into a vibrant, customizable snack plate? It’s a dish I keep coming back to when I want a quick, satisfying bite that feels a bit special, even on a busy weeknight. Over the years, I’ve played with different flavor combos, each time discovering new ways to enjoy this humble ingredient.
Key Ingredients Breakdown
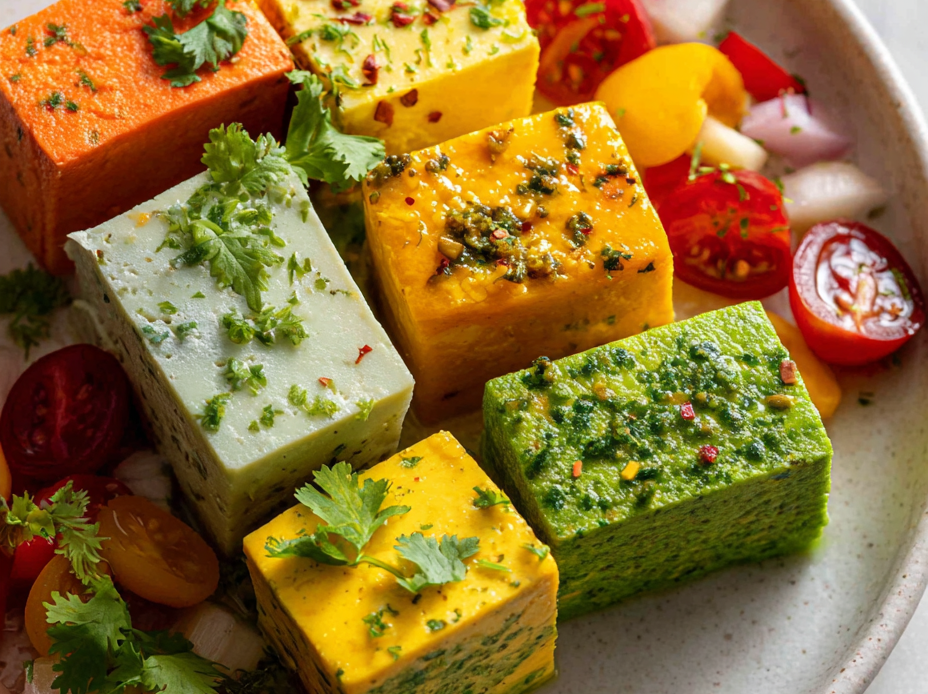
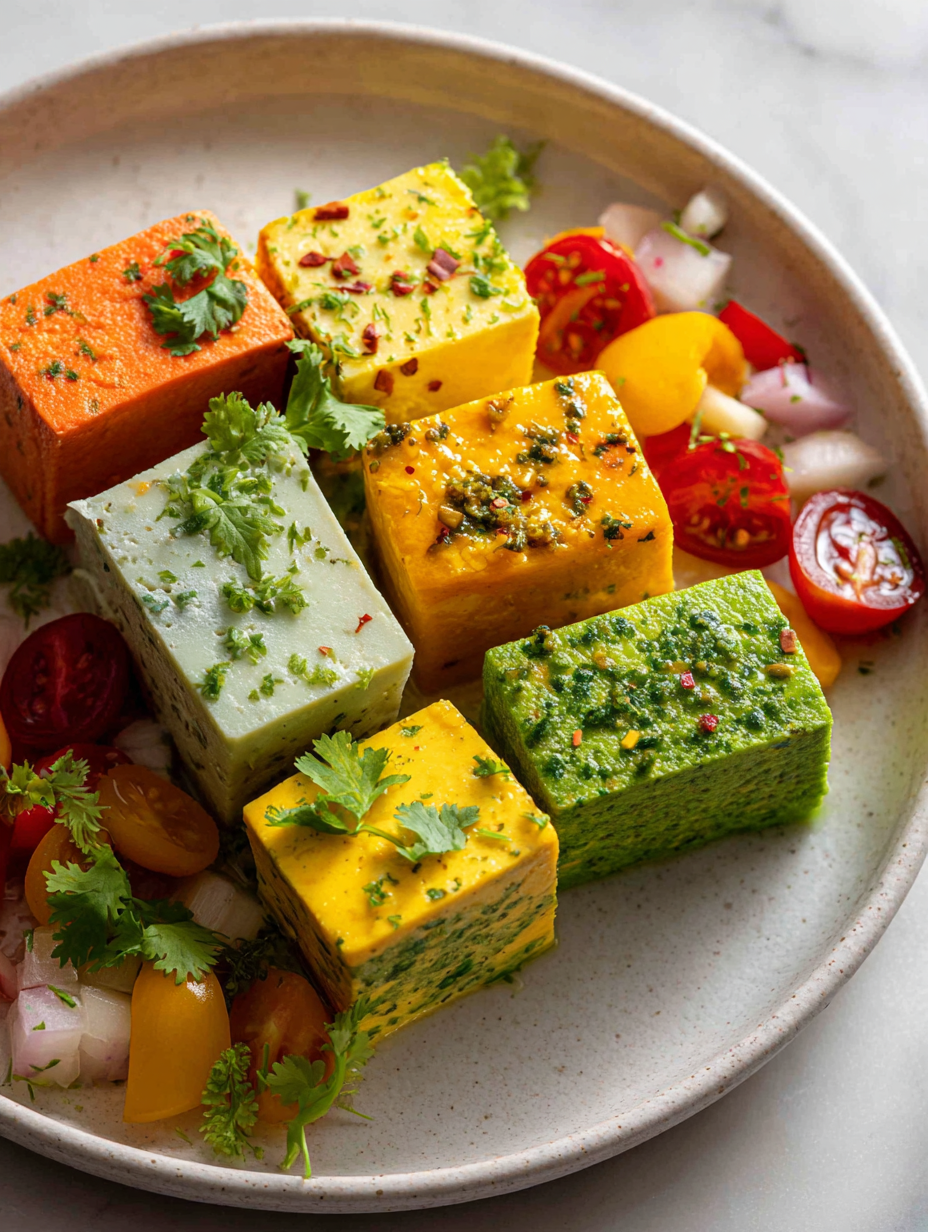
- Paneer: I like mine slightly firm with a golden crust, which gives it a chewy bite and a smoky aroma. Try pressing out excess moisture if you want it crisper.
- Chili Powder: Adds a gentle kick and a vibrant red hue. Adjust the amount if you prefer milder or more intense heat—think of it as your flavor dial.
- Lemon Juice: Brightens everything up with a zesty spark that cuts through richness. Use fresh lemon for the brightest, most lively tang.
- Mixed Nuts: I love the crunch they bring, especially toasted almonds or cashews. Toast them lightly to release their nutty aroma and deepen flavor.
- Fresh Herbs: Cilantro or mint make a lively, herby contrast. Chop just before serving to keep their bright, fresh aroma alive.
- Yogurt Dip: Creamy, tangy, and cooling—an instant way to balance spicy or smoky flavors. Use full-fat for richness or Greek yogurt for extra thickness.
- Pickles: Their sharp, vinegary bite adds a burst of acidity that wakes up the palate. Slice them thin to distribute flavor evenly across the plate.
Spotlight on Key Ingredients
Paneer:
- I like mine slightly firm with a golden crust, which gives it a chewy bite and a smoky aroma. Try pressing out excess moisture if you want it crisper.
- Chili Powder: Adds a gentle kick and a vibrant red hue. Adjust the amount if you prefer milder or more intense heat—think of it as your flavor dial.
- Lemon Juice: Brightens everything up with a zesty spark that cuts through richness. Use fresh lemon for the brightest, most lively tang.
Nuts & Herbs:
- Mixed Nuts: I love the crunch they bring, especially toasted almonds or cashews. Toast them lightly to release their nutty aroma and deepen flavor.
- Fresh Herbs: Cilantro or mint make a lively, herby contrast. Chop just before serving to keep their bright, fresh aroma alive.
Ingredient Swaps & Tips
- Dairy-Free: Coconut or almond-based cheese can replace paneer, offering a richer, slightly sweeter flavor and softer texture.
- Spicy Heat: Adjust chili powder or swap with cayenne for more punch, or omit entirely for milder bites.
- Herbs: Fresh basil or dill can stand in for cilantro or mint, bringing different aromatic profiles without losing freshness.
- Nuts: Use roasted pumpkin seeds or sunflower seeds if nuts are off-limits; they add crunch but less oiliness.
- Yogurt: Coconut yogurt or tahini-based dips work well for dairy-free options, though they lend a different tang and creaminess.
- Pickles: Freshly sliced green olives or capers can add acidity and saltiness if traditional pickles aren’t available.
- Lemon Juice: Lime juice or vinegar can substitute for brightness, each bringing its own sharpness and depth.
Equipment & Tools
- Non-stick skillet: For even cooking and easy flipping of paneer.
- Spatula: To flip and handle hot paneer without breaking.
- Cutting board: Prep surface for slicing paneer and herbs.
- Sharp knife: Cut paneer into uniform cubes and chop herbs.
- Small bowl: Mix marinade and hold ingredients.
- Serving platter: Present the assembled snack plate attractively.
Step-by-step Guide to Paneer Snack Plate
- Equipment & Tools: Gather a non-stick skillet, spatula, cutting board, sharp knife, small bowl, and serving platter. The skillet is for pan-frying paneer; the spatula helps flip without breaking; the bowl for marinating; the board and knife for prep; the platter for assembly.
- Cut the paneer into 1 cm (½ inch) thick cubes. Aim for uniform size so they cook evenly. Set aside.
- In a small bowl, mix 1 tsp chili powder, ½ tsp salt, ½ tsp turmeric, and 1 tbsp oil. Toss the paneer cubes gently in this marinade. Let sit for 10 minutes to absorb flavors.
- Heat the skillet over medium heat (~160°C/320°F). Add a splash of oil and let it shimmer. Place the marinated paneer cubes in a single layer. Cook for 3-4 minutes until the underside is golden and crispy.
- Flip the paneer carefully with a spatula. Cook for another 3-4 minutes, until all sides are golden and edges are slightly charred. If sticking occurs, loosen gently with the spatula.
- During the last minute, squeeze fresh lemon juice over the paneer for brightness. The smell should turn citrusy and fresh. If paneer is sticking, add a tiny splash of water and cover briefly to loosen.
- Transfer the cooked paneer to a plate lined with paper towel for a quick drain. Let rest for 2 minutes to firm up.
- Assemble the snack plate: arrange paneer cubes, scatter chopped herbs, nuts, and sliced pickles. Drizzle with yogurt or serve on the side. Finish with a squeeze of lemon if desired.
- Resting & Finishing: Rest the paneer for 2 minutes; this helps set the crust. Garnish with herbs and nuts just before serving for maximum freshness and crunch.
- Checkpoints & How to Know It’s Done: Paneer should be golden and crispy on outside, tender inside. The lemon juice should shimmer on the surface, and herbs should be bright green. The nuts should be toasted and fragrant.
Let the paneer rest for 2 minutes to firm up. Garnish with herbs and nuts just before serving. Serve immediately with yogurt or pickles on the side.
How to Know It’s Done
- Paneer is golden and crispy outside, tender inside.
- Nuts are toasted and aromatic.
- Herbs are bright and fragrant, lemon juice shimmers.
Colorful Paneer Snack Plate
Ingredients
Equipment
Method
- Gather a non-stick skillet, spatula, cutting board, sharp knife, small bowl, and serving platter. Begin by pressing the paneer cubes gently with a paper towel if they feel moist.
- In a small bowl, mix chili powder, salt, turmeric, and a splash of oil to create a flavorful marinade. Gently toss the paneer cubes in the spice mixture, ensuring each piece is coated evenly. Let sit for about 10 minutes to absorb the flavors.
- Heat the skillet over medium heat until it shimmers lightly, and add a tablespoon of oil. Carefully place the marinated paneer cubes in a single layer, making sure not to crowd the pan. Cook for 3-4 minutes on one side until golden brown and crispy.
- Flip each paneer cube gently with the spatula, cooking for another 3-4 minutes until all sides are golden and slightly charred, filling your kitchen with a toasty aroma. If they stick, loosen gently with the spatula and add a splash of water if needed.
- Once cooked, squeeze fresh lemon juice over the paneer and give them a quick toss to brighten the flavors. Turn off the heat and transfer the paneer to a plate lined with paper towels to drain excess oil.
- While the paneer cools slightly, toast the mixed nuts in the same pan for 2-3 minutes until fragrant and golden. Chop the fresh herbs finely just before serving to keep their vibrant aroma.
- Arrange the crispy paneer cubes on a serving platter. Scatter the toasted nuts, chopped herbs, and thin slices of pickles around the paneer. Drizzle with the creamy yogurt or serve it on the side for dipping.
- Finish with an extra squeeze of lemon or a sprinkle of herbs for an extra burst of freshness. Serve immediately to enjoy the contrast of crispy paneer with crunchy nuts and tangy accompaniments.
Tips & Tricks for Perfect Paneer
- Hot pan: Ensure your skillet shimmers before adding paneer to achieve a crispy crust.
- Oil balance: Use just enough oil to coat the pan lightly; too much can make the paneer soggy.
- Gentle flipping: Use a spatula to flip paneer carefully, preventing breakage and maintaining even crispness.
- Lemon squeeze: Add fresh lemon juice at the end for a bright, zesty aroma that enhances all flavors.
- Nuts toast: Lightly toast nuts until fragrant for extra crunch and a deeper nutty flavor.
- Herb freshness: Chop herbs just before serving to preserve their bright aroma and vibrant color.
- Rest time: Let cooked paneer rest for 2 minutes to set the crust and prevent crumbling when plated.
Common Mistakes and How to Fix Them
- FORGOT to preheat pan → Ensure the skillet shimmers before adding paneer.
- DUMPED too much oil → Use just enough to coat the pan lightly; too much causes sogginess.
- OVER-TORCHED paneer → Cook on medium heat; high heat burns outside before inside cooks.
- MISSED resting time → Rest cooked paneer 2 minutes to set the crust and avoid breakage.
Quick fixes for paneer plate
- When pan is too cold, splash a tiny bit of water and wait for shimmer.
- Splash a little lemon juice if the paneer looks dull or bland.
- Patch a sticking pan by adding a splash of water and covering briefly.
- Shield overcooked paneer with a sprinkle of fresh herbs to mask slight bitterness.
- Use toasted nuts from pantry if fresh are unavailable; they’ll still add crunch.
Prep, Store, and Reheat Tips
- Prep the paneer cubes and marinade (chili, lemon, herbs) a day in advance; keeps flavors vibrant and ready to cook.
- Store cooked paneer in an airtight container in the fridge for up to 2 days; it firms up slightly but still remains tender.
- Nuts can be toasted and stored in a jar for up to a week; they’ll stay crunchy and aromatic, ready to sprinkle on the plate.
- Assemble the snack plate just before serving to keep herbs fresh and nuts crunchy; refrigeration can cause sogginess.
- Reheat cooked paneer briefly in a hot pan or oven (around 180°C/356°F for 5 minutes) until warmed through and crispy again; smells smoky and inviting.
Top questions about paneer snack plate
1. How should I cut the paneer?
Use fresh, firm paneer cut into even cubes for the best texture and ease of cooking.
2. Do I need to marinate the paneer?
Marinate the paneer briefly in spices and oil, about 10 minutes, to infuse flavor before frying.
3. How long does it take to cook the paneer?
Cook on medium heat until the paneer is golden and crispy, about 6-8 minutes total, flipping gently.
4. When should I add lemon juice?
Add lemon juice at the end for a fresh, zesty brightness that lifts all the flavors.
5. How do I prepare the nuts?
Toast nuts lightly until fragrant, about 2-3 minutes, to enhance their crunch and aroma.
6. Should I prepare herbs ahead of time?
Use fresh herbs chopped just before serving to keep them bright and aromatic.
7. Can I make this ahead?
Serve immediately after assembly for the best crunch and freshness, but leftovers keep in the fridge for a day.
8. How do I reheat leftovers?
Reheat cooked paneer in a hot skillet for 3-4 minutes until crispy and warmed through.
9. Can I make it milder or spicier?
Adjust spice levels by adding more or less chili powder or swapping with milder paprika.
10. What if the paneer sticks to the pan?
If the paneer sticks, loosen it with a tiny splash of water and cover briefly to release steam.
This paneer snack plate is a reminder that simple ingredients can become a canvas for experimentation and personal flair. It’s perfect for spontaneous gatherings or a quick weeknight treat that feels a little more special.
In these busy times, having a versatile, vibrant snack at hand can make all the difference. It’s not just about the flavors—it’s about creating something that sparks joy and sparks conversation at the table.
Hi, I’m Madison Greene, the voice and creator behind Texture Obsessed. Born and raised in the United States, I’ve always believed that food is more than just flavor — it’s about the way it feels.


