Getting a perfect sear on scallops isn’t just about the technique; it’s about controlling the heat. Many cooks overlook how crucial the pan’s temperature is, and that’s where the magic either happens or falls flat. I’ve learned to pay close attention to that initial sizzle, because it sets the tone for everything that follows.
There’s something satisfying in watching those delicate, plump scallops turn from translucent to beautifully caramelized in just a few minutes. It’s a quick dance—hot pan, precise timing, and a bit of patience. When it all lines up, you get a crust that’s golden, crisp, and just the right amount of smoky, without ever overcooking the tender inside.
Focusing on the overlooked importance of the pan’s temperature and how it directly influences the perfect sear, emphasizing that achieving the right heat is the secret ingredient many miss.
The overlooked heat secret
- Seared scallops remind me of summer nights by the coast, where the simple joy of good seafood feels like a small celebration.
- There’s a rush of pride when I get that perfect golden crust—like I’ve cracked a secret only a few know about.
- I still get nervous every time I cook scallops; it’s a delicate balance, but nailing it makes me feel like a kitchen wizard.
- Cooking scallops takes patience and a keen eye, but when the aroma of caramelized shellfish fills the air, all the effort melts away.
- That first crisp bite of a well-seared scallop—soft, sweet, and smoky—still makes me smile, no matter how many times I do it.
The secret behind perfect sear
- Seared scallops have always been my go-to for a quick, impressive dish, but it wasn’t until I started focusing on the pan’s temperature that I truly understood their magic. I used to think it was all about technique, but really, that first hot sizzle makes all the difference. Getting that initial hit of heat right is what gives you the perfect crust without overcooking the tender inside.
- One night, I was rushing to dinner with friends, and I decided to try searing scallops with a bit more attention to the heat. When those shells hit the pan and immediately crackled, I knew I was onto something. That golden-brown crust, paired with the sweet aroma filling the kitchen, made me realize how much nuance this simple dish holds—just a matter of respecting that initial sizzle.
- Now, every time I cook scallops, I remind myself that it’s the small details—like that initial pan temperature—that turn a good meal into a memorable one. It’s a dance of patience, heat, and timing. And honestly, nothing beats that first bite—soft, sweet, with a smoky, crispy edge—reminding me why I love cooking seafood so much.
Contextual origin, trivia, or history
- Pan-searing scallops became popular in French cuisine, where the focus on precise heat and crust forms the basis of many classic dishes.
- Historically, scallops were considered a luxury seafood, often reserved for festive occasions, and mastering their sear was a mark of kitchen skill.
- The technique of searing seafood like scallops was refined in coastal regions, where fresh shellfish were abundant and quick, high-heat cooking was preferred to preserve freshness.
- In the 20th century, chefs started emphasizing the importance of pan temperature control, realizing it’s the key to achieving a perfect crust without overcooking.
- Quirky fact: The term ‘scallop’ also refers to a type of shell used in decorative arts, which shares its name with the seafood because of its ridged, fan-like appearance.
Key ingredients and tips
- Scallops: I prefer the dry-packed kind—they sear better with that firm, slightly salty bite. If yours are wet-packed, pat them dry thoroughly before hitting the pan.
- Salt: I season just before searing to enhance their natural sweetness. Too early, and they’ll start to release excess moisture, making the crust soggy.
- Oil: I use a high-smoke-point oil like grapeseed or canola—nothing too smoky, so the scallops get that perfect golden crust without burning.
- Butter: A small knob added at the end brings richness and a nutty aroma. Skip it if you want a dairy-free version, but I love that extra layer of flavor.
- Lemon: I squeeze fresh lemon right after searing for brightness. Skip if you prefer a more subdued, buttery finish without citrus popping through.
- Herbs: Parsley or chives add a fresh contrast. I toss them on just before plating to keep that vibrant green and bright flavor.
- Pepper: Freshly cracked black pepper right at the end adds a subtle spice. Don’t go overboard—just enough to lift the dish.
Spotlight on key ingredients
Scallops:
- I prefer dry-packed—they sear better with that firm, slightly salty bite. If yours are wet-packed, pat them dry thoroughly before hitting the pan.
- Salt: I season just before searing to enhance their natural sweetness. Too early, and they’ll start to release excess moisture, making the crust soggy.
- Oil: I use a high-smoke-point oil like grapeseed or canola—nothing too smoky, so the scallops get that perfect golden crust without burning.
Lemon & Herbs:
- Lemon: I squeeze fresh lemon right after searing for brightness. Skip if you prefer a more subdued, buttery finish without citrus popping through.
- Herbs: Parsley or chives add a fresh contrast. I toss them on just before plating to keep that vibrant green and bright flavor.
- Pepper: Freshly cracked black pepper right at the end adds a subtle spice. Don’t go overboard—just enough to lift the dish.
Notes for ingredient swaps
- Seafood Alternatives: Use firm fish fillets like halibut or sea bass if scallops aren’t available. They won’t sear as quickly but still give a lovely crust.
- Oil Swap: Switch to avocado or light olive oil for a higher smoke point and subtle flavor, especially if your usual oil starts to smoke.
- Butter-Free: Omit butter or replace with clarified butter or a neutral oil if you want to avoid dairy or reduce richness.
- Citrus Substitute: Lime juice works well for a more tart punch, while orange zest adds a sweet, bright note without overpowering.
- Herb Variations: Fresh thyme or tarragon can replace parsley or chives, offering different aromatic profiles that complement seafood.
- Salt Alternatives: Use sea salt flakes or smoked salt for an extra layer of flavor—just be mindful of the saltiness level.
- Lemon Variants: Lemon zest can be used instead of juice for a more fragrant, less watery citrus note.
Equipment & Tools
- Heavy skillet (cast iron or stainless steel): Ensures even heat for a proper sear.
- Tongs: To flip scallops gently without breaking them.
- Paper towels: For thoroughly drying scallops and cleaning excess moisture.
- Spatula: To assist in turning or removing scallops if needed.
Step-by-step guide to pan searing
- Equipment & Tools: Use a heavy stainless-steel or cast-iron skillet for even heat. Have tongs, a paper towel, and a spatula ready.
- Dry the scallops with a paper towel thoroughly. Moisture is the enemy of that perfect sear.
- Season the scallops with salt just before cooking. Too early and they release moisture, preventing browning.
- Heat your pan over medium-high heat until it’s hot enough to shimmer—about 200°C / 390°F. A drop of water should dance and evaporate immediately.
- Add a small amount of oil—just enough to coat the bottom. Swirl to spread evenly.
- Place scallops in the pan, spaced out. Don’t overcrowd; they need space to sear properly.
- a. Sear without moving for about 2 minutes. Look for a golden-brown crust forming, and listen for a crackling sound.
- b. Flip the scallops carefully with tongs. Sear the other side for another 1.5–2 minutes until golden.
- c. Check for the right crust color and slightly firm texture. If they look pale or soft, give them an extra 30 seconds.
- Optional: During the last 30 seconds, add a small knob of butter and baste the scallops with it for richness and sheen.
- Remove scallops from the pan and place on a plate. Let them rest for 1 minute to finish cooking internally and settle juices.
- Finishing & Plating: Drizzle with lemon or herbs if desired. Serve immediately for the best texture and flavor.
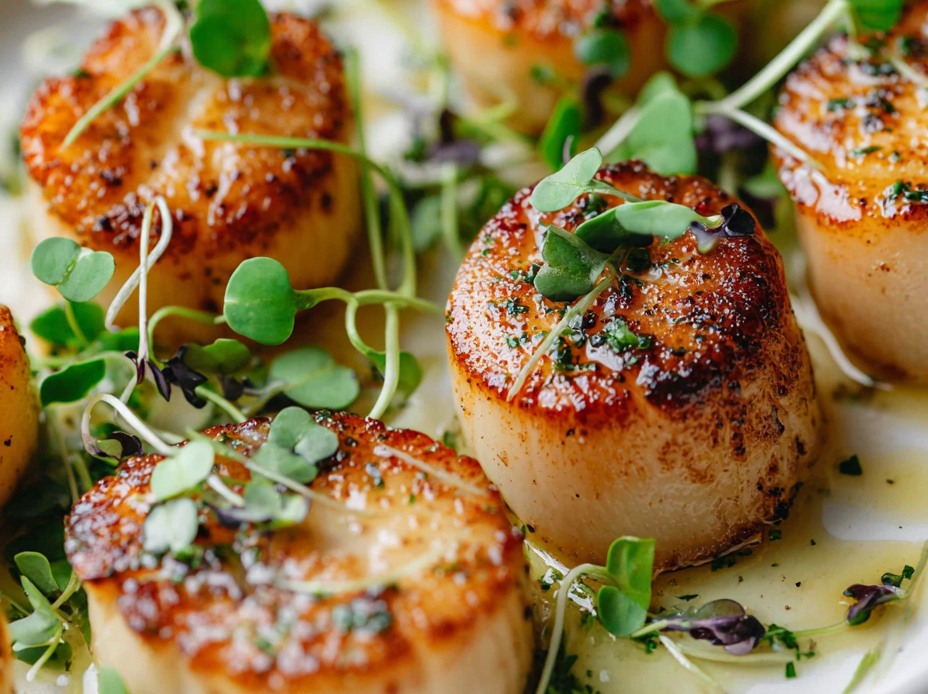
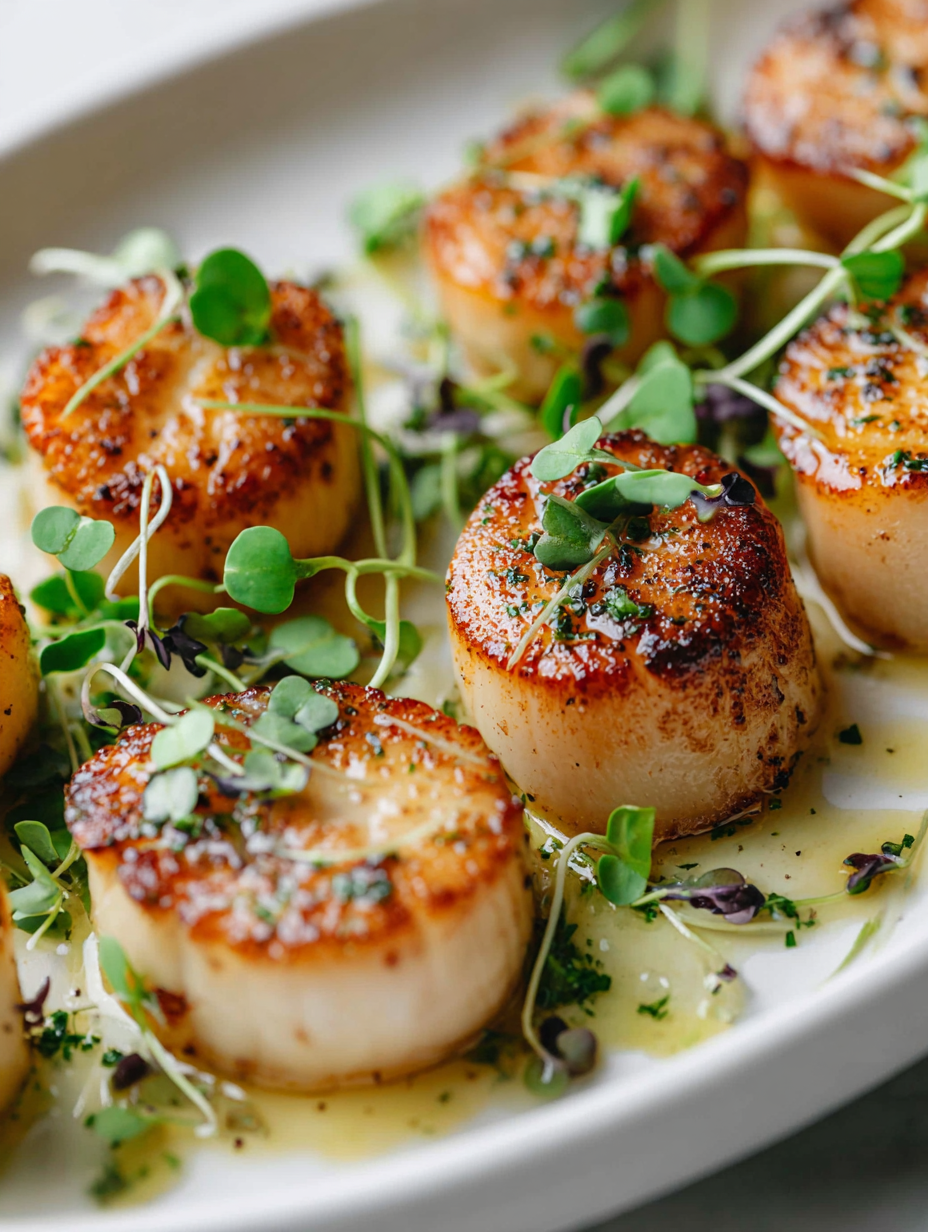
- Checkpoints & How to Know It’s Done: The edges should be crispy and golden, scallops should be firm but tender when gently pressed, and the interior should be opaque.
Rest scallops on a plate for 1 minute. Finish with a squeeze of lemon and a sprinkle of herbs. Plate immediately to enjoy the contrast of crispy exterior and tender interior.
How to Know It’s Done
- Golden-brown crust with a slight shimmer.
- Scallops are opaque and firm but not rubbery.
- Internal temperature around 50°C / 122°F for perfect doneness.
Perfect Pan-Seared Scallops
Ingredients
Equipment
Method
- Pat the scallops dry with paper towels until no moisture remains. This step is crucial for achieving a good sear and crispy crust.
- Sprinkle the scallops with sea salt just before cooking; this enhances their natural sweetness and helps with browning.
- Heat your heavy skillet over medium-high heat until it’s shimmering hot—this should take about 2-3 minutes and produce a faint smoke. A drop of water should dance and evaporate immediately.
- Add a thin layer of high-smoke-point oil to the pan, swirling to coat evenly. The oil should bubble gently and become hot enough to shimmer.
- Carefully place the scallops into the pan, spacing them apart to avoid overcrowding. You should hear a loud sizzle as they make contact with the hot surface.
- Let the scallops sear undisturbed for about 2 minutes until they develop a deep golden-brown crust on one side. You’ll see a change in color and hear consistent sizzling.
- Flip each scallop gently using tongs, and sear the second side for another 1.5 to 2 minutes until equally golden. The scallops should be firm but still tender when pressed lightly.
- Optional: During the last 30 seconds, add a small knob of butter to the pan and baste the scallops with the melted butter for added richness and a glossy finish.
- Remove the scallops from the pan and transfer them to a plate. Rest for about 1 minute to allow juices to settle and finish cooking internally.
- Squeeze fresh lemon juice over the scallops and sprinkle with chopped herbs for a bright, fresh flavor. Serve immediately to enjoy their crispy exterior and tender interior.
Notes
Pro tips for perfect scallops
- Preheat thoroughly: Ensure your pan is hot enough—almost to the point of smoking—before adding scallops for that perfect sear.
- Dry scallops completely: Pat with paper towels until no moisture remains; moisture prevents that golden crust from forming.
- Don’t crowd the pan: Leave enough space between scallops; overcrowding lowers the temperature and causes steaming instead of searing.
- Sear without moving: Place scallops in the pan and let them develop a crust for about 2 minutes before flipping, to avoid tearing and uneven browning.
- Use high-smoke-point oil: Grapeseed or canola oil work best; they handle high heat without burning, giving you that crisp exterior.
- Finish with butter: Add a small knob of butter during the last 30 seconds of searing and baste for extra richness and color.
- Rest briefly: Let the scallops sit for a minute after cooking; this helps juices redistribute, keeping them tender inside.
Common mistakes and how to fix them
- TOO COLD PAN: Preheat thoroughly to avoid sticking and ensure a good sear.
- DAMP SCALLOPS: Pat dry completely; excess moisture prevents browning and crispy crust.
- OVERCOOKING: Remove scallops when just opaque; overcooking makes them rubbery.
- UNDERTURNED: Flip once at the right time; too early or too late affects crust and texture.
Quick fixes and pantry swaps
- If scallops stick, splash a little more oil and let the pan reheat. They’ll release easily.
- When scallops look pale, increase heat slightly to develop a better crust.
- Dumped too much oil? Wipe the pan quickly and start again with fresh oil.
- Over-torched? Remove from heat immediately and add a splash of lemon for balance.
- When in doubt, pantry swap to coconut oil for a subtle, smoky aroma and high smoke point.
Prep, store, and reheat tips
- Dry the scallops thoroughly with paper towels before storing to maintain their texture and searing quality.
- Store scallops in an airtight container in the fridge for up to 1-2 days; keep them on a bed of ice or in the coldest part for best freshness.
- For longer storage, freeze scallops in a single layer wrapped tightly in plastic wrap and then in foil, lasting up to 3 months. Thaw in the fridge overnight before cooking.
- Reheat cooked scallops gently in a warm skillet over low heat for just a minute or two; avoid high heat to prevent rubberiness. Expect a slight loss of crispness and moisture.
Top questions about pan seared scallops
1. How do I choose the right scallops?
Look for scallops that are dry-packed; they sear better and get that crispy exterior. Wet-packed tend to be slimy and release excess water, making searing tricky.
2. How dry should the scallops be?
Pat the scallops very dry with paper towels before cooking. Moisture is the enemy of a good sear and will cause splattering.
3. How hot should the pan be?
The pan should be hot enough that a drop of water dances and evaporates immediately—around 200°C / 390°F. Use a high-smoke-point oil like grapeseed.
4. How long do I cook scallops?
Cook the scallops for about 2 minutes on each side until they develop a golden-brown crust. They should be opaque and firm but still tender inside.
5. When should I flip the scallops?
Flip the scallops only once, when they develop a crust and release easily from the pan. Overturning can break the crust and lead to uneven cooking.
6. How do I know when scallops are done?
Remove scallops from the heat when they are opaque and firm but still slightly soft to the touch. Overcooking makes them rubbery.
7. Should I add butter during cooking?
Adding butter at the end and baste for a minute enhances richness and gives the scallops a glossy, flavorful finish. Don’t overdo it to avoid greasiness.
8. When should I serve the scallops?
Serve immediately after resting for a minute to allow juices to settle. Over time, they lose their crispness and become less tender.
9. What if my scallops stick or burn?
If scallops stick, splash a little more oil and increase heat slightly. Use a thin metal spatula to loosen them gently. If burnt, reduce heat and clean the pan.
10. How should I store leftover scallops?
Store scallops in the coldest part of your fridge, ideally on ice, and cook within 24 hours for best freshness. Freeze if longer storage is needed.
Seared scallops might seem simple, but nailing that perfect crust comes down to respecting the heat and patience. Once you get that initial sizzle right, the rest feels like second nature, and the flavor payoff is worth every minute.
This dish reminds me how much joy there is in small, precise moments in the kitchen—those seconds when everything aligns. It’s a quick, elegant way to celebrate seafood, especially when fresh scallops are in season or just calling out for a special treat.

Hi, I’m Madison Greene, the creator behind Texture Obsessed. If you have ever fallen in love with the crunch of a perfectly toasted crust, the silkiness of a smooth custard, or the contrast between crispy and creamy in a single bite, then you already understand what inspires me.

