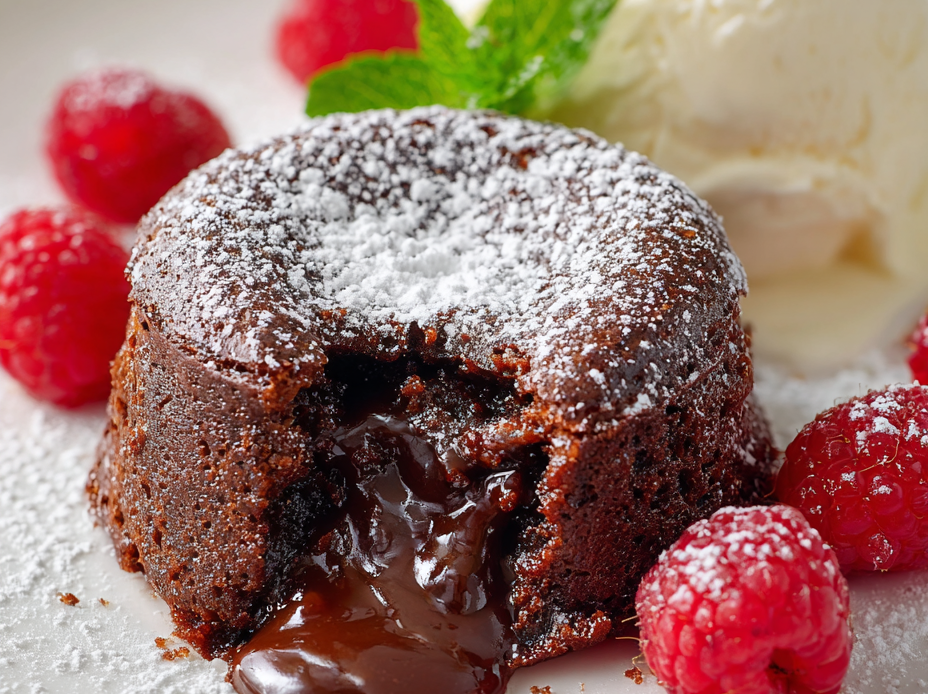
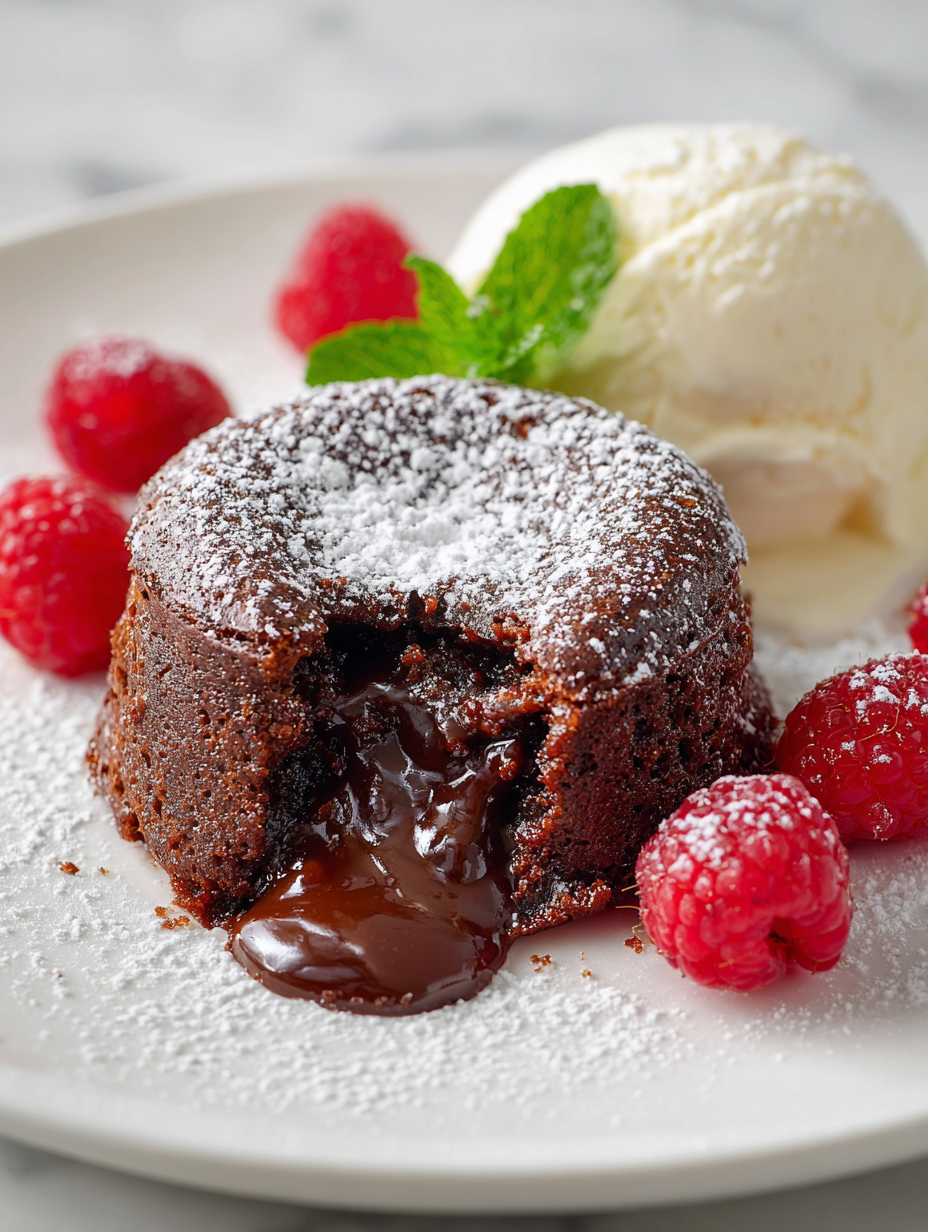
There’s something almost meditative about cracking into a perfectly baked chocolate fondant. The crisp shell gives way to that luscious, molten center, and I swear, it’s a moment of pure tactile pleasure. It’s the kind of dessert that turns a simple dinner into a memory, all thanks to that satisfying crack and the warm, gooey richness that follows.
I love how this recipe makes me slow down—focusing on that first bite, feeling the contrast between the firm exterior and the silky, almost liquid chocolate inside. It’s a small act of indulgence that demands attention, turning a humble ingredient into a moment of sensory delight. No fancy equipment needed—just a good oven and a bit of patience, and you’re set for a little bit of magic.
Focusing on the tactile pleasure of cracking the perfect chocolate fondant, highlighting the contrast between the crisp exterior and the gooey interior, and how that sensory experience transforms the simple act of dessert into a moment of pure textural joy.
The tactile joy of cracking
- Cracking into a warm fondant feels like breaking a tiny chocolate shell, revealing that molten core—pure sensory magic.
- There’s an almost rebellious joy in how this dessert looks simple but delivers such a rich, gooey surprise inside.
- I remember the first time I nailed the bake—watching that center stay just runny enough to dip my spoon in and smile.
- Sometimes, the best moments are in the chaos—overbaking just a little, then rushing to serve it before it cools and loses that luscious jiggle.
The story behind this recipe
This recipe came from a moment of wanting to capture that perfect balance of textures—crisp on the outside, molten on the inside. I was experimenting late one night, trying to mimic those decadent desserts I’d had in tiny Parisian cafés. Each attempt taught me something new about timing and temperature, and now, every time I make it, I think back to those quiet kitchen hours filled with the smell of melting chocolate and butter. It’s a dish that’s as much about patience as it is about pleasure, and I love how it transforms a simple chocolate fix into an act of small, focused indulgence.
Trivia and origins
- Chocolate fondant, also known as molten lava cake, reportedly originated in France in the 1980s, with multiple chefs claiming to have invented it independently.
- The name ‘fondant’ refers to the smooth, melt-in-the-mouth texture of the interior, which contrasts sharply with the crisp exterior—an intentional play on textures.
- Early recipes often used dark chocolate with a high cocoa content, emphasizing richness and that signature gooey center.
- In France, it’s sometimes called ‘omelette au chocolat’—not because it’s an egg dish, but for its quick, simple preparation reminiscent of flipping an omelette.
Key ingredients and tips
- Dark chocolate: I use a high cocoa content bar—rich, slightly bitter, with that deep, smoky aroma that makes the molten center so addictive. Swap with semi-sweet if you prefer milder sweetness, but avoid milk chocolate for this one.
- Butter: I prefer unsalted, but salted butter works fine—just cut back on the added salt. It’s the fat that gives the fondant that luscious, velvety texture and helps the chocolate melt smoothly.
- Eggs: Fresh, large eggs give structure and a tender crumb. If you’re out, aquafaba can work in a pinch, but it won’t quite have the same richness or stability.
- Sugar: Granulated is my go-to—brings balance without overshadowing the chocolate’s complexity. Light brown adds a hint of caramel, if you’re feeling that extra warmth.
- Flour: Just a touch to stabilize the center—use plain all-purpose flour. Skip if you want an even more gooey, less structured interior, but be careful with overbaking.
- Cocoa powder: I use a Dutch-processed variety—deepens the chocolate flavor and gives a richer color. Natural cocoa will work in a pinch, but the flavor will be a touch brighter and more acidic.
- Optional flavorings: A splash of vanilla or a pinch of sea salt can heighten the chocolate’s depth—try different salts for a smoky or floral twist.
Spotlight on key ingredients
Dark chocolate:
- I use a high cocoa content bar—rich, slightly bitter, with that deep, smoky aroma that makes the molten center so addictive. Swap with semi-sweet if you prefer milder sweetness, but avoid milk chocolate for this one.
- Butter: I prefer unsalted, but salted butter works fine—just cut back on the added salt. It’s the fat that gives the fondant that luscious, velvety texture and helps the chocolate melt smoothly.
Eggs, Sugar, Flour:
- Eggs: Fresh, large eggs give structure and a tender crumb. If you’re out, aquafaba can work in a pinch, but it won’t quite have the same richness or stability.
- Sugar: Granulated is my go-to—brings balance without overshadowing the chocolate’s complexity. Light brown adds a hint of caramel, if you’re feeling that extra warmth.
- Flour: Just a touch to stabilize the center—use plain all-purpose flour. Skip if you want an even more gooey, less structured interior, but be careful with overbaking.
Notes for ingredient swaps
- Dairy-Free: Swap butter with coconut oil or dairy-free margarine; expect a slightly different richness and a hint of coconut aroma.
- Vegan Chocolate: Use plant-based dark chocolate and vegan butter or coconut oil; the texture stays smooth, but flavor may be a touch fruitier.
- Less Sugar: Reduce sugar by a quarter or half; the fondant will be less sweet, highlighting the chocolate’s depth.
- Gluten-Free: Substitute regular flour with almond flour or gluten-free baking mix; may result in a slightly denser texture.
- Lactose-Free: Use lactose-free butter and chocolate; no change in flavor but suitable for sensitive diets.
- Bittersweet Chocolate: Choose darker, more intense chocolate for a richer, less sweet fondant experience; adjust sugar slightly if needed.
- Add Spices: Mix in a pinch of cinnamon or chili powder for a warm, smoky twist; keep it subtle to not overpower the chocolate.
Equipment & Tools
- Ramekins: Individual molds for baking the fondant evenly.
- Heatproof bowl: To melt chocolate and butter gently.
- Spatula: For folding and mixing ingredients gently.
- Whisk: To combine eggs and sugar aerodynamically.
- Oven: To bake the fondants at precise temperature.
- Cooling rack: To cool the melted chocolate mixture slightly before mixing.
- Spoon or offset spatula: To invert and serve the fondants smoothly.
Step-by-step guide to chocolate fondant
- Preheat your oven to 200°C (390°F). Grease four ramekins thoroughly with butter and dust with cocoa powder to prevent sticking.
- Melt 200g dark chocolate and 150g butter together in a heatproof bowl over a simmering pot or in short bursts in the microwave, stirring until smooth. Let it cool slightly.
- In a separate bowl, whisk 3 large eggs and 100g sugar until just combined and slightly frothy, about 30 seconds. Avoid overbeating to keep the batter tender.
- Pour the cooled chocolate mixture into the egg mixture, gently folding together with a spatula. Add 2 tablespoons of flour and fold until just combined—do not overmix.
- Divide the batter evenly among the prepared ramekins. Tap each ramekin lightly on the counter to remove air bubbles and level the surface.
- Bake for 12-14 minutes. The edges should be set and firm, but the center still jiggly when gently shaken. The tops may crack slightly but should not be overbaked.
- Remove from oven and let sit for 1 minute. Then, carefully invert each ramekin onto a serving plate and gently lift to release the fondant. The center should ooze out when pierced with a spoon.
- Serve immediately with a dusting of powdered sugar or a scoop of vanilla ice cream. The contrast between crisp shell and molten core is essential.
Let the baked fondants rest for 1 minute outside the oven. Then, gently invert onto plates and serve immediately for best molten effect. Garnish with a light dusting of cocoa or powdered sugar if desired.
How to Know It’s Done
- Edges are firm and set; center is still jiggly when shaken.
- Cracks form on the surface but batter remains moist and shiny inside.
- When inverted, the fondant releases cleanly with a gooey center flowing out.
Chocolate Fondant
Ingredients
Equipment
Method
- Preheat your oven to 200°C (390°F). Generously butter four ramekins and dust them with cocoa powder, tapping out the excess so they’re well coated.
- Chop the dark chocolate into small pieces and melt it together with the butter in a heatproof bowl over simmering water, or in short bursts in the microwave, stirring until smooth and glossy. Let it cool slightly to prevent cooking the eggs.
- In a separate bowl, whisk the eggs and sugar together until just combined and slightly frothy, about 30 seconds. This helps incorporate some air and creates a tender crumb.
- Pour the slightly cooled chocolate mixture into the egg mixture, gently folding with a spatula until smooth and uniform. Be careful not to deflate the batter.
- Add the flour and cocoa powder to the batter, folding gently until just combined. This small amount of flour stabilizes the center but keeps it gooey inside.
- Divide the batter evenly among the prepared ramekins, filling each about three-quarters full. Tap each ramekin lightly on the counter to release any air bubbles and to level the surface.
- Bake in the preheated oven for 12 to 14 minutes. The edges should be set and firm, but the center will still jiggle slightly when gently shaken—this is key to that molten core.
- Remove the ramekins from the oven and let them sit for about 1 minute. Then, carefully invert each onto a serving plate, gently lifting the ramekin to release the fondant. The tops should crack open slightly, revealing the gooey interior.
- Serve immediately while warm, with an optional dusting of cocoa powder or a scoop of vanilla ice cream. The contrast of the crisp exterior and molten center makes each bite a delight.
Tips for Perfect Chocolate Fondant
- Bolded mini-head: Use room temperature eggs → Helps the batter incorporate smoothly, avoiding streaks or lumps.
- Bolded mini-head: Chill the ramekins slightly before filling → Prevents the batter from sliding and helps the fondant hold its shape during baking.
- Bolded mini-head: Bake just until the edges are set → The center should still jiggle slightly; overbaking kills that molten core.
- Bolded mini-head: Tap the ramekins after baking → Ensures the fondant releases cleanly and maintains that perfect gooey interior.
- Bolded mini-head: Serve immediately after inverting → The molten center is at its peak, flowing out with each cut or spoonful.
- Bolded mini-head: Add a pinch of sea salt on top → Enhances the chocolate flavor and balances the sweetness for a deeper taste.
- Bolded mini-head: Use a timer and check visually → Rims should be firm and slightly cracked, but the center jiggly and luscious.
Common mistakes and how to fix them
- FORGOT to check oven temperature → Use an oven thermometer for accuracy.
- DUMPED batter too quickly → Pour slowly to avoid air bubbles and uneven baking.
- OVER-TORCHED the fondant → Remove promptly; overbaking kills that gooey interior.
- UNDER-BAKED → Extend baking time by 1 minute and check for jiggle.
Quick fixes and pantry swaps
- When batter appears too thick, splash in a teaspoon of warm water to loosen it.
- If fondant cracks upon inversion, gently warm the ramekin edges with a damp cloth before trying again.
- Splash a little hot water around the ramekin base to help release stubborn fondants quickly.
- Patch over a cracked fondant with a small dollop of melted chocolate to conceal imperfections.
- Shield overbaked fondants by serving immediately with a drizzle of warm chocolate sauce.
Prep, store, and reheat tips
- Prepare the batter up to a day in advance; keep covered in the fridge to preserve freshness and prevent skin formation.
- Store baked fondants in an airtight container in the fridge for up to 24 hours. Reheat briefly in a warm oven or microwave, checking for a soft center and fragrant aroma.
- For best texture, reheat just until the center is warm and gooey—avoid overheating, which can firm up the molten core.
- Refrigerated fondants may lose some of their initial gooeyness; serve with a fresh dusting of cocoa or a scoop of ice cream to revive the contrast.
- Freezing is possible for up to 2 months; thaw overnight in the fridge, then reheat carefully to avoid overcooking the center.
Top questions about chocolate fondant
1. What exactly is a chocolate fondant?
A gooey, molten center that flows out when you cut into it, contrasting with a tender, baked exterior.
2. Which chocolate should I use for the best fondant?
Use high-quality dark chocolate with at least 70% cocoa for rich flavor. Milk chocolate will be too sweet and less gooey.
3. How do I know when my fondant is baked perfectly?
Bake until the edges are set and firm, but the center still jiggles slightly when shaken—usually 12-14 minutes at 200°C (390°F).
4. How should I serve the fondant?
Invert the ramekin onto a plate immediately after baking and serve right away to enjoy the molten center at its best.
5. Why did my fondant crack?
If the fondant cracks on top, it’s overbaked. Remove sooner next time or check at 12 minutes for a jiggly center.
6. Can I make it ahead and reheat?
Store baked fondant in the fridge for up to 24 hours, reheating briefly in the oven or microwave just until warm and gooey.
7. What if my fondant is overbaked?
Overbaking causes the center to firm up. To fix, bake for less time or check earlier, around 12 minutes, for a soft, flowing core.
8. Can I use cold eggs?
Use room temperature eggs for smooth mixing and a tender crumb. Cold eggs can cause batter to seize or be uneven.
9. Should I add salt?
A pinch of sea salt on top enhances the chocolate’s richness and balances the sweetness, adding depth to each bite.
10. My batter is too thick, what do I do?
If the batter feels too thick, splash in a teaspoon of warm water to loosen it for easier pouring and better expansion during baking.
Cracking into a warm, molten chocolate fondant is like a tiny celebration of texture and temperature. That immediate contrast—crisp shell giving way to velvety, oozing richness—never gets old. It’s a simple pleasure that demands full attention, especially when served straight from the oven, still gleaming with that glossy, inviting surface.
This dessert feels like a little act of indulgence that’s worth the effort. No matter how many times I make it, I’m always surprised by how quickly it disappears—the perfect combination of comfort and wow-factor, right when you need it most.

Hi, I’m Madison Greene, the creator behind Texture Obsessed. If you have ever fallen in love with the crunch of a perfectly toasted crust, the silkiness of a smooth custard, or the contrast between crispy and creamy in a single bite, then you already understand what inspires me.

