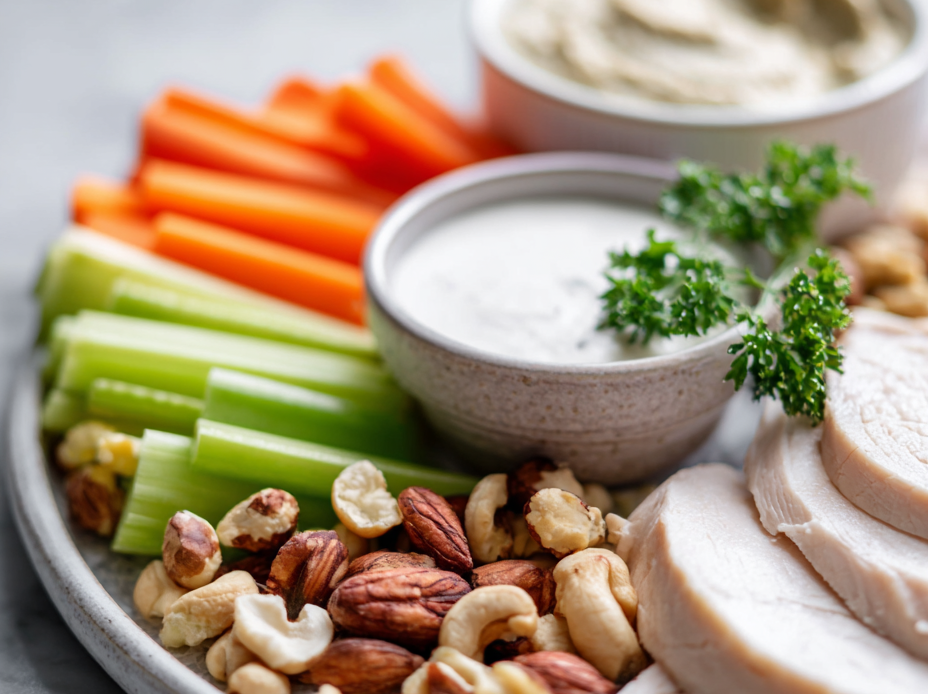
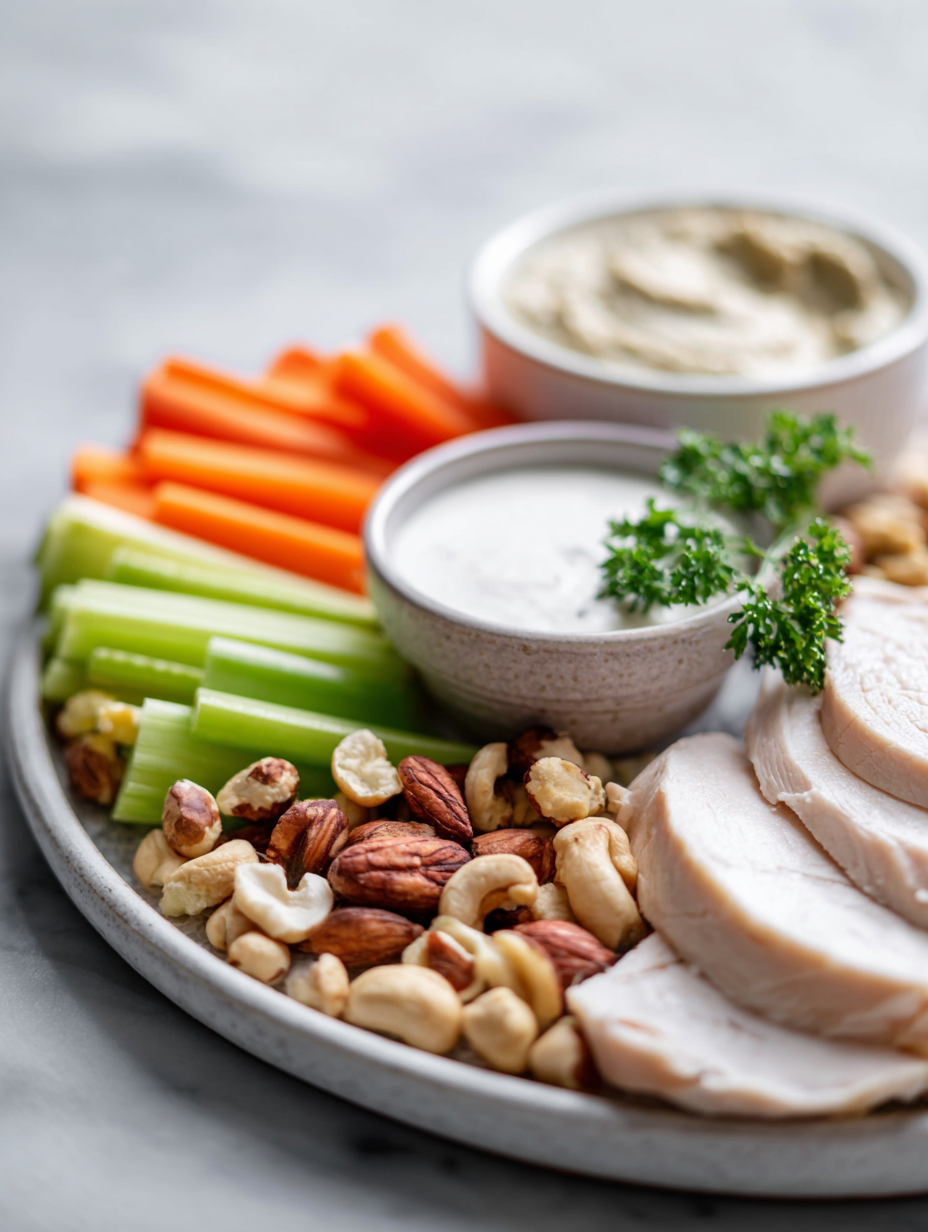
This Turkey Snack Box is my go-to for those days when I want a mix of flavors in one portable package. It’s like a tiny, edible lunchbox filled with bits of turkey, cheese, and crunchy snacks—perfect for picnics, quick lunches, or just a little treat that doesn’t require a fork.
What makes this recipe special isn’t just the flavors, but how customizable it is. I love tossing in my favorite dips, pickles, or even a handful of dried fruits. It’s a bit chaotic but honest—an honest reflection of how I want my snacks to feel: simple, satisfying, and a little playful.
Making this is almost meditative; layering ingredients feels like building a tiny, edible puzzle. Plus, it’s a great way to clear out odds and ends from the fridge. When I pack it up, I know I’ve got a balanced, flavorful mini feast that’s both practical and a little nostalgic.
Focusing on the idea of turning a simple, portable snack into a nostalgic, customizable mini feast that feels like a cozy lunchbox adventure, but with a modern twist.
The story behind this recipe
- This turkey snack box came together one lazy afternoon when I was rummaging through the fridge, looking for something quick but satisfying. I wanted to create a little portable feast that felt more like a treat than a meal, something I could grab on the go without sacrificing flavor. The idea of combining familiar deli flavors with crunchy, pickled, and fresh elements struck me then and there, and I started layering ingredients like building a tiny, edible puzzle.
- It’s become my favorite way to turn leftover turkey or deli slices into something playful and nostalgic. Packing it feels almost like assembling a childhood lunchbox, but with a grown-up twist. Each component has a story—crisp veggies, creamy dips, sharp cheeses—that makes every bite a little adventure. It’s honest, imperfect, and perfect for those days when I want simplicity mixed with a dash of chaos.
- heading
- story_type
Key ingredients and tips
- Turkey: I prefer roasted, slightly crispy edges that add a smoky bite. You can swap in chicken if turkey’s not available, but it won’t have the same rich flavor.
- Cheese: Sharp cheddar melts into those little pockets of turkey, adding a creamy, tangy punch. For a milder touch, go with mozzarella, but skip the sharpness.
- Pickles: The briny crunch here is essential—think of that satisfying snap and vinegary zing. If you dislike pickles, sliced olives or capers can give a similar salty punch.
- Veggies: Crisp cucumber or carrot sticks add freshness and texture. If you want a softer bite, roasted peppers or cherry tomatoes work well too.
- Dips & Spreads: I love a smear of mustard or hummus for contrast. If you’re out, a swipe of plain Greek yogurt mixed with herbs can be just as satisfying.
- Crackers & Nuts: For crunch and salt, I reach for whole-grain crackers or toasted almonds. If nuts aren’t your thing, crunchy chickpeas are a good swap.
- Extras: Dried fruits like cranberries or apricots bring a sweet counterpoint. Skip if you prefer savory only, but they really brighten the mix.
Spotlight on key ingredients
Turkey:
- I prefer roasted, slightly crispy edges that add a smoky bite. You can swap in chicken if turkey’s not available, but it won’t have the same rich flavor.
- Cheese: Sharp cheddar melts into those little pockets of turkey, adding a creamy, tangy punch. For a milder touch, go with mozzarella, but skip the sharpness.
- Pickles: The briny crunch here is essential—think of that satisfying snap and vinegary zing. If you dislike pickles, sliced olives or capers can give a similar salty punch.
Veggies:
- Crisp veggies: Cucumber or carrot sticks add a refreshing crunch and vibrant color. During cooking, they stay firm and juicy, providing a satisfying bite.
- Pickles: Their vinegary zest intensifies as they sit, adding brightness and a satisfying snap. They behave well with other ingredients, maintaining their texture.
Notes for ingredient swaps
- Turkey: I prefer roasted, slightly crispy edges that add a smoky bite. You can swap in chicken if turkey’s not available, but it won’t have the same rich flavor.
- Cheese: Sharp cheddar melts into those little pockets of turkey, adding a creamy, tangy punch. For a milder touch, go with mozzarella, but skip the sharpness.
- Pickles: The briny crunch here is essential—think of that satisfying snap and vinegary zing. If you dislike pickles, sliced olives or capers can give a similar salty punch.
- Veggies: Crisp cucumber or carrot sticks add freshness and texture. If you want a softer bite, roasted peppers or cherry tomatoes work well too.
- Dips & Spreads: I love a smear of mustard or hummus for contrast. If you’re out, a swipe of plain Greek yogurt mixed with herbs can be just as satisfying.
- Crackers & Nuts: For crunch and salt, I reach for whole-grain crackers or toasted almonds. If nuts aren’t your thing, crunchy chickpeas are a good swap.
- Extras: Dried fruits like cranberries or apricots bring a sweet counterpoint. Skip if you prefer savory only, but they really brighten the mix.
Equipment & Tools
- Large platter or divided lunchbox: To assemble and serve the snack box neatly.
- Small bowls or containers: To hold dips and spreads separately.
- Sharp knife: To slice cheese, veggies, and pickles cleanly.
- Spatula or spoon: To spread dips and assemble ingredients smoothly.
- Refrigerator: To keep ingredients fresh before serving.
Step-by-step guide to Turkey Snack Box
- Gather all ingredients: sliced turkey, cheese, pickles, crunchy snacks, dips, and fresh veggies. Prep your workspace with a large platter or container for assembly.
- Choose a sturdy, shallow container or a divided lunchbox that can hold all components comfortably. Keep everything within reach.
- Start with a layer of crackers or sturdy bread at the bottom. This acts as a base to keep everything stable and adds crunch.
- Layer slices of turkey evenly over the crackers. Aim for a generous, even spread to make each bite satisfying.
- Add small piles or slices of cheese on top of the turkey. Use sharp cheddar or your favorite melting cheese for flavor.
- Place pickles or other briny elements strategically around the turkey and cheese. They add a punch of acidity and crunch.
- Sprinkle in chopped fresh veggies—cucumbers, carrots, or cherry tomatoes— for freshness and color.
- Add dips or spreads in small containers or dollops—mustard, hummus, or herbed Greek yogurt. These bring moisture and flavor contrast.
- Finish with crunchy snacks—nuts, toasted chickpeas, or crispy crackers—on top or in a corner for easy nibbling.
- If packing for later, cover tightly with a lid or plastic wrap. Keep refrigerated if not eaten immediately.
- Before serving, give the box a gentle shake or a quick rearrange to distribute flavors evenly. Serve at room temp for maximum flavor.
Once assembled, cover the box tightly. Let it sit for 10 minutes at room temperature to meld flavors slightly. Serve directly from the container or transfer to a plate for a more presentable look.
How to Know It’s Done
- Crackers and cheese should be slightly golden and firm at the edges.
- Pickles and veggies should be crisp, brightly colored, and fresh.
- Dips should be smooth and not watery, with a fresh aroma and vibrant hue.
Turkey Snack Box
Ingredients
Equipment
Method
- Arrange all your ingredients: sliced turkey, cheese, pickles, cucumber sticks, carrot sticks, dips, crackers, nuts, and dried fruits, within reach on your workspace to keep everything organized.
- Start by placing a layer of whole-grain crackers at the bottom of your container or lunchbox, creating a sturdy base for your layers.
- Layer slices of turkey evenly over the crackers, spreading them out to cover the surface and make each bite satisfying.
- Place small slices or cubes of sharp cheddar cheese over the turkey, adding pops of creamy, tangy flavor.
- Add thin slices of pickles around the turkey and cheese, their briny crunch providing a bright, flavorful contrast.
- Arrange cucumber and carrot sticks in a corner or along the side for fresh, crisp texture and vibrant color.
- Dollop or spread your favorite dip—mustard or hummus—in small containers or directly on the ingredients if preferred.
- Sprinkle toasted almonds and dried cranberries over the top, adding crunch and a touch of sweetness to balance the savory elements.
- Gently press down on the assembled ingredients to help everything settle and meld together.
- Cover the snack box tightly with a lid or plastic wrap and refrigerate until ready to serve, ideally within a few hours to keep everything fresh.
- When ready to enjoy, open the box, give it a gentle shake or rearrange if needed, and serve at room temperature for maximum flavor and texture.
Pro tips for perfect snack assembly
- Bolded mini-head: Use a hot, dry pan for searing the turkey slices to get a crispy, golden edge.
- Bolded mini-head: Chill your cheese slightly before slicing for cleaner, neater cuts without sticking.
- Bolded mini-head: Layer pickles and veggies in different zones to prevent sogginess and keep textures distinct.
- Bolded mini-head: Toast nuts or crackers lightly before adding for an extra crunch and richer flavor.
- Bolded mini-head: When melting cheese, cover loosely with foil for even, gooey coverage without burning.
- Bolded mini-head: Pack ingredients in layers — heavier items on the bottom, delicate on top to keep everything neat.
- Bolded mini-head: Use a sharp knife and gentle sawing motion when slicing for clean cuts, especially through cheese.
Common mistakes and how to fix them
- FORGOT to check the internal temperature → Use a thermometer to ensure 74°C (165°F).
- DUMPED the marinade too early → Let the turkey rest 10 minutes before slicing.
- OVER-TORCHED the edges → Cook at 200°C (400°F), monitor for even browning.
- MISSED the resting step → Rest turkey 5-10 minutes for juicier slices.
Quick Fixes for Snack Prep
- When sauce is too thick, splash in a little broth and stir until shiny.
- If turkey slices are dry, patch with a dab of mayo or mustard for moisture.
- Overcooked nuts? Shield with a sprinkle of sea salt and a quick toast to revive flavor.
- Forgot a crunchy element? Ditch stale crackers and swap in toasted chickpeas for crunch.
- Splash a few drops of lemon juice when veggies look dull, for bright, fresh flavor.
Prep, store, and reheat tips
- Prep all ingredients—slice turkey, cheese, and veggies—up to a day in advance. Keep in separate airtight containers in the fridge to maintain freshness and crunch.
- Assemble the snack box shortly before serving to prevent sogginess; if not, layer ingredients carefully to keep textures distinct.
- Shelf life is best within 24 hours; flavors meld and ingredients stay crisp. After that, expect some veggie wilt and cracker softness.
- Reheat the turkey slices in a hot skillet for 1-2 minutes until warmed through—look for a slight sizzle and aroma of toasted meat—then assemble. Dips and crunchy elements are best added fresh.
Top questions about Turkey Snack Box
1. Can I use leftover turkey?
Use cooked, sliced turkey for quick assembly. Warm it slightly if you want a softer bite.
2. Can I swap the turkey for another meat?
Yes, sliced chicken or ham works well. They have different flavors but still fit the snack concept.
3. What cheese works best?
Cheddar adds a sharpness, but mozzarella or Swiss are milder options. Choose based on your flavor preference.
4. Can I omit pickles?
Pickles bring a briny crunch. If you dislike them, try sliced olives or capers for a similar salty punch.
5. What vegetables suit this snack?
Crunchy vegetables like cucumber or carrots add freshness. Roasted peppers or cherry tomatoes also work nicely.
6. What dips should I include?
Dips like mustard, hummus, or herbed yogurt enhance flavor and moisture. Keep them separate until serving.
7. How should I pack it for later?
Use sturdy containers or divided lunchboxes to keep ingredients neat and prevent sogginess during transport.
8. Can I prepare this ahead?
Assemble just before eating to keep everything crisp. If prepping in advance, layer ingredients carefully and refrigerate.
9. How do I reheat leftovers?
Reheat turkey slices briefly in a hot skillet for a softer texture. Serve at room temperature for best flavor.
10. What if the snack gets soggy?
If ingredients seem soggy, add a fresh layer of crackers or nuts just before serving to restore crunch.
This turkey snack box is a little ritual I turn to when I want something satisfying and familiar, but with a twist. The mix of textures—crisp veggies, melty cheese, and smoky turkey—makes each bite feel like a small celebration of simple flavors. It’s honest, a bit chaotic, but always hits the right note for me.
In times when I need a quick lunch or a portable snack that feels thoughtful, this box comes through. It’s a reminder that good ingredients and a little layering can turn everyday moments into something a bit more special. No matter how busy the day, it’s those small, flavorful bites that keep me grounded.

Hi, I’m Madison Greene, the creator behind Texture Obsessed. If you have ever fallen in love with the crunch of a perfectly toasted crust, the silkiness of a smooth custard, or the contrast between crispy and creamy in a single bite, then you already understand what inspires me.

