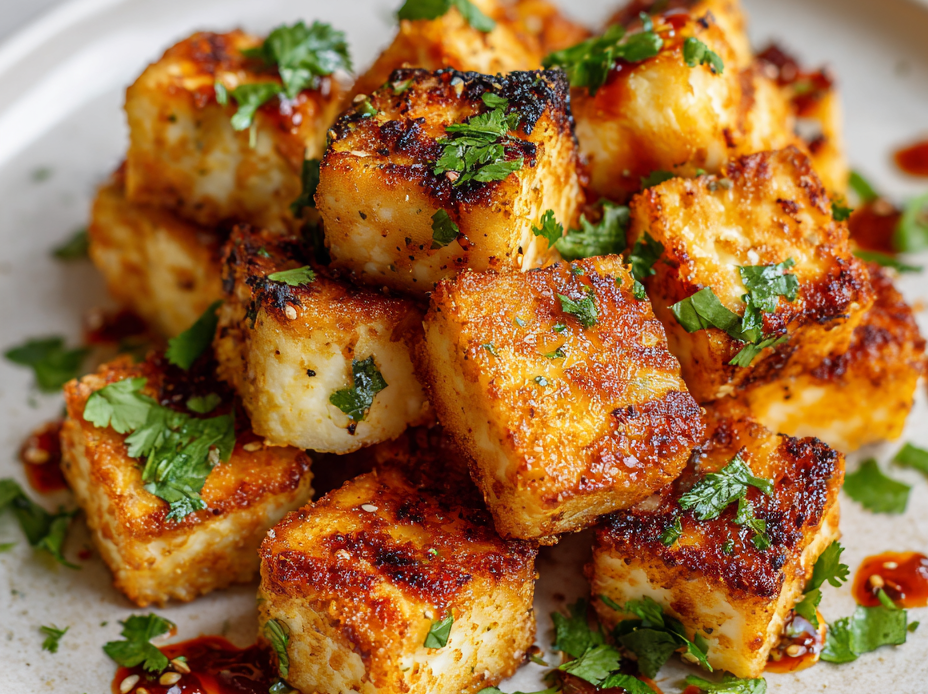
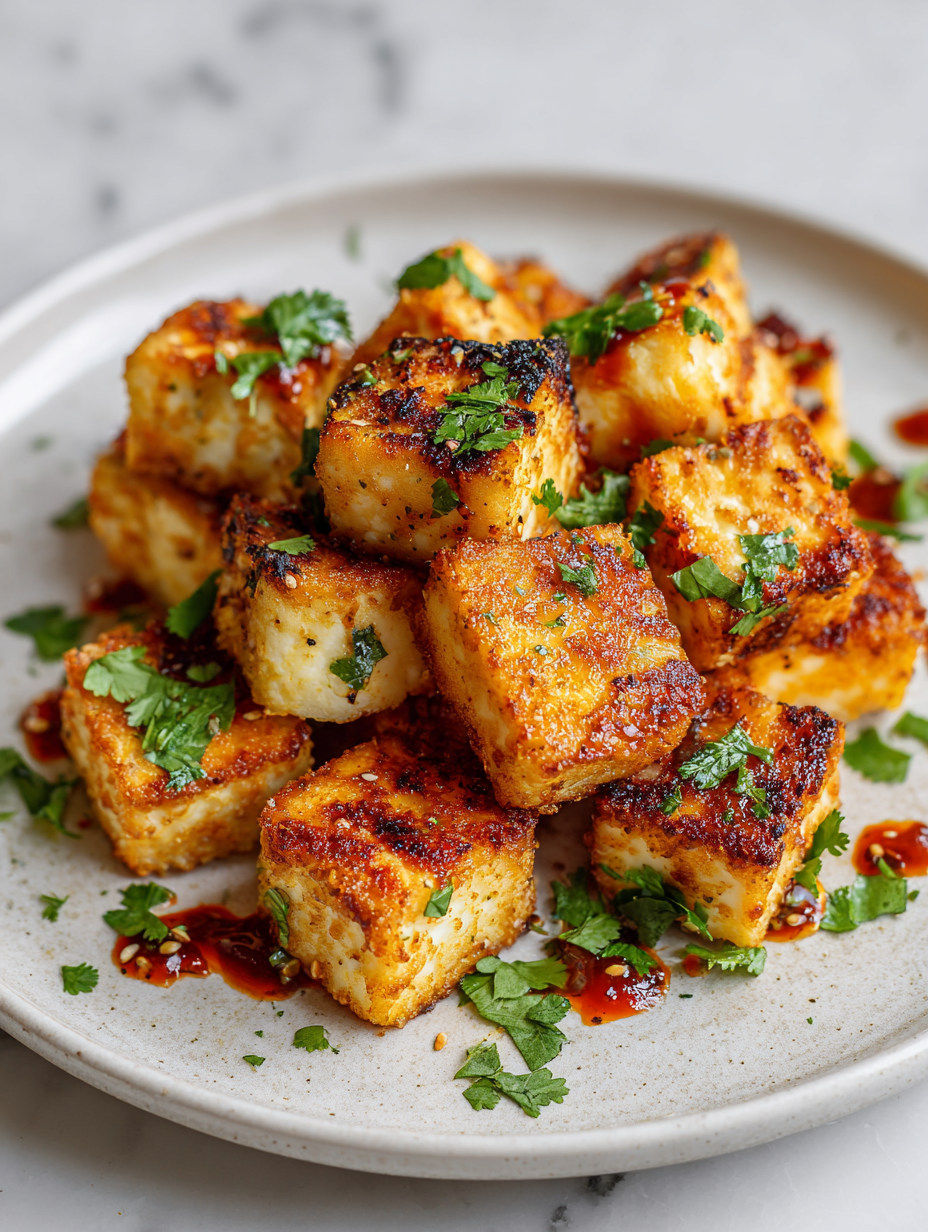
There’s something truly satisfying about transforming plain paneer into something with a crispy, golden crust. It’s a simple trick that elevates the humble cheese into a snack or appetizer that surprises everyone at the table.
I love how this quick sear adds a textural contrast—chewy inside, crisp outside—that makes every bite interesting. It’s not just about flavor; it’s about playing with the contrast and bringing out the best in that soft, milky paneer.
This recipe is perfect for those moments when I want something quick, satisfying, and a little bit special. It’s a small step that changes the way I see and enjoy paneer, making it more than just a component—it’s the star.
Focusing on the texture transformation of paneer cubes through a quick, caramelized sear, highlighting how this simple step elevates their chewy softness into a crispy, golden crust that surprises even seasoned cooks.
The story behind this recipe
I first stumbled upon this method during a chaotic week when I needed something quick and satisfying. I was experimenting with different ways to make paneer more interesting, and that caramelized sear just clicked. It reminded me of childhood snacks—crispy on the outside, soft inside—and I knew I had to perfect it. Since then, this simple trick has become my go-to for transforming everyday paneer into something special, especially when I want a little crunch without fuss.
Ingredient breakdown: key components
- Paneer: I prefer firm, fresh paneer for a sturdy bite, but if you want it softer, opt for slightly fresher cheese. The squeak and chewiness should be just right for crisping.
- Oil: I use neutral oil like vegetable or canola for even searing, but a light drizzle of ghee adds a nutty aroma that’s irresistible during the fry.
- Spices: A pinch of turmeric and chili powder gives the paneer a subtle color and warmth, but skip if you want a milder flavor—just salt and pepper then.
- Cornstarch: I coat the cubes in cornstarch for that extra crunch, but rice flour works too if you want a slightly lighter crust. Shake off excess before frying to avoid sogginess.
- Salt: I season the paneer before frying to ensure every bite is flavorful. Taste the marinade or seasoning mix first—over-salting can make it tough, so keep it balanced.
- Optional herbs: Fresh cilantro or mint can brighten the dish after cooking, releasing a fresh, herbaceous aroma that cuts through the richness of the paneer.
- Lemon juice: A squeeze right after frying adds a zing that lifts the richness—don’t skip the acid for that bright, fresh finish.
Spotlight on key ingredients
Paneer:
- I prefer firm, fresh paneer for a sturdy bite, but if you want it softer, opt for slightly fresher cheese. The squeak and chewiness should be just right for crisping.
- Oil: I use neutral oil like vegetable or canola for even searing, but a light drizzle of ghee adds a nutty aroma that’s irresistible during the fry.
Coating ingredients:
- Cornstarch: I coat the cubes in cornstarch for that extra crunch, but rice flour works too if you want a slightly lighter crust. Shake off excess before frying to avoid sogginess.
- Lemon juice: A squeeze right after frying adds a zing that lifts the richness—don’t skip the acid for that bright, fresh finish.
Notes for ingredient swaps
- Dairy-Free: Coconut milk or tofu can replace paneer for a vegan twist, though the texture changes to softer and less chewy.
- Oil: Avocado or sesame oil adds a different aroma and smoke point; avoid overpowering flavors with neutral oils if you prefer subtlety.
- Spices: Smoked paprika instead of chili powder for a smoky kick, or omit spices altogether for a milder flavor.
- Cornstarch: Rice flour or potato starch can be used, resulting in a slightly different crispness and texture on the outside.
- Salt: Sea salt or kosher salt can be swapped, but reduce quantity slightly to account for their stronger flavor.
- Herbs: Basil or parsley instead of cilantro or mint; fresh herbs add brightness but different aroma profiles.
- Lemon juice: Lime juice for a slightly more tart, citrusy note that complements the spices differently.
Equipment & Tools
- Non-stick or cast-iron skillet: Provides even heat for crisping without sticking.
- Spatula and tongs: Handle and flip the paneer carefully.
- Small mixing bowl: Mix coating ingredients thoroughly.
Step-by-step guide to paneer cubes
- Gather your equipment: a non-stick or cast-iron skillet, a spatula, a small bowl for coating, and tongs for flipping. Preheat the skillet over medium heat, about 160°C (320°F), until a light shimmer appears.
- Cut the paneer: slice into 1-inch cubes, aiming for even sizes so they cook uniformly. Pat dry with a clean towel to remove excess moisture, which helps crisp the outside.
- Prepare the coating: in the small bowl, mix 2 tablespoons of cornstarch with a pinch of salt and optional spices like chili powder or turmeric for color and flavor.
- Coat the paneer: gently toss the cubes in the cornstarch mixture, ensuring each piece is lightly and evenly coated. Shake off excess to prevent sogginess.
- Fry the paneer: carefully place the cubes in the hot skillet. Let them cook undisturbed for 2–3 minutes until the edges start to turn golden brown and crispy. Then, flip with tongs and cook for another 2–3 minutes. The smell should hint at roasted cheese and a slight crackle as they crisp.
- Check for doneness: the cubes should be golden, with a firm, crispy exterior and a chewy inside. If they’re pale, give them more time, but avoid burning. If sticking, gently loosen with a spatula.
- Remove and drain: transfer the crispy paneer to a paper towel-lined plate. Let them rest for 1 minute to set the crust.
- Finish and serve: squeeze fresh lemon juice over hot paneer, sprinkle with chopped herbs if desired, and serve immediately for maximum crunch and flavor.
Transfer fried paneer to a plate, squeeze lemon over, sprinkle herbs if using, then serve hot immediately for the best crunch and flavor.
How to Know It’s Done
- Cubes are golden and crispy on the outside.
- Paneer feels firm and slightly jiggly but not floppy.
- aroma of toasted cheese and spices wafts up during frying.
Crispy Sear Paneer Bites
Ingredients
Equipment
Method
- Begin by patting the paneer dry with a paper towel to remove excess moisture, which helps achieve a crispy exterior.
- Cut the paneer into 1-inch cubes, aiming for even sizes so they cook uniformly. Set aside.
- In a small mixing bowl, combine cornstarch with turmeric, chili powder, and a pinch of salt. Mix well to distribute the spices evenly.
- Gently toss the paneer cubes in the spice mixture, ensuring each piece is lightly coated. Shake off any excess to prevent sogginess.
- Preheat your skillet over medium heat until it shimmers slightly, indicating it's hot and ready for frying.
- Add the oil to the skillet, swirling to coat the bottom evenly. Wait until the oil is hot—just enough to sizzle when paneer is added.
- Carefully place the coated paneer cubes into the hot oil in a single layer, making sure not to overcrowd the pan. Let them cook undisturbed for 2–3 minutes, until the edges turn golden brown and crispy.
- Use tongs to flip the paneer cubes gently, cooking the other sides for an additional 2–3 minutes until all sides are evenly crispy and golden.
- Remove the crispy paneer from the skillet and place on a paper towel-lined plate to drain excess oil. Let them rest for a minute to set the crust.
- Squeeze fresh lemon juice over the hot paneer, then sprinkle with chopped herbs if using. Serve immediately for maximum crunch and flavor.
Notes
Tips for perfect paneer cubes
- Hot pan: Get your skillet to a steady 160°C (320°F) before adding paneer for even crisping.
- Light coating: Shake off excess cornstarch; too much can lead to sogginess, too little won’t crisp properly.
- Gentle flip: Use tongs to turn the cubes gently, avoiding breakage and ensuring a golden crust on all sides.
- Timing: Don’t rush the sear—2–3 minutes per side is enough for that perfect crispy, golden exterior.
- Smell: The aroma of toasted cheese and spices signals your paneer is crisping perfectly, not burning.
- Rest briefly: Let fried paneer rest for a minute on paper towels; it helps set the crust and keeps it crispy.
- Finish with acid: Squeeze lemon immediately after frying to brighten flavors and cut through richness.
Common mistakes and how to fix them
- FORGOT to preheat the pan → Ensure the skillet is hot before adding paneer.
- DUMPED too much oil → Use just enough to cover the bottom lightly for crisping.
- OVER-TORCHED the cubes → Keep an eye on heat; medium ensures golden, not burnt.
- MISSED to shake off excess cornstarch → Prevents sogginess; tap off before frying.
Quick fixes and pantry swaps
- If the oil shimmers, but doesn’t crackle, increase heat slightly to get that sear.
- When paneer sticks, gently loosen with a spatula and turn down heat to prevent burning.
- Splash a few drops of water if the pan smokes excessively during frying.
- Patch soggy cubes with a quick re-fry in hot oil for crispness revival.
- Shield delicate cubes from drafts—use a lid or cover to keep heat consistent during searing.
Prep, store, and reheat tips
- Prep the paneer cubes by cutting and coating in advance; keep them refrigerated uncovered for up to 2 hours to prevent sticking.
- Store cooked, crispy paneer in an airtight container in the fridge for up to 24 hours—reheat for best texture.
- Reheating in a hot skillet for 2-3 minutes restores crispness, but avoid overcrowding to prevent sogginess.
- For longer storage, freeze the paneer in a single layer on a baking sheet, then transfer to a bag; use within 1 month.
- Freezing may dull the crisp exterior slightly; reheat directly from frozen to regain some crunch, watching carefully.
Top questions about paneer cubes
1. What kind of paneer works best for frying?
Use firm, fresh paneer that squeaks when you bite. It crisps up better and holds shape well.
2. How do I make the paneer crispy?
Coat the paneer cubes in a light layer of cornstarch or rice flour to get that crispy outside.
3. How hot should the pan be?
Preheat your pan over medium heat until it shimmers, then add the oil before frying the paneer.
4. How long should I fry the paneer?
Fry the paneer for 2-3 minutes per side until golden and crispy, then drain on paper towels.
5. Should I add anything after frying?
Add a squeeze of lemon after frying for a bright contrast; fresh herbs also lift the flavor.
6. Can I make this ahead?
Store leftovers in an airtight container in the fridge for up to 24 hours. Reheat in a hot skillet for crispness.
7. What if my paneer sticks to the pan?
If the paneer sticks or burns, lower the heat and loosen with a spatula. Keep an eye on the temperature.
8. What oil should I use?
Use neutral oils like vegetable or canola for even searing. Ghee adds flavor but can burn faster.
9. Can I customize the spices?
If you want a smoky flavor, substitute smoked paprika for chili powder in the coating.
10. How much oil do I need?
Ensure the oil is just enough to lightly coat the bottom of the pan; too much can soggify.
This simple paneer cubes recipe is a reminder that a little caramelization goes a long way. It’s those crispy edges and smoky aroma that turn an everyday ingredient into something memorable. I keep coming back to it when I need comfort or just a quick snack that feels a bit special.
No matter how often I make it, that first crunchy bite with a squeeze of lemon still makes me smile. It’s honest, imperfect, and exactly what I want—something to savor slowly, with no fuss. And honestly, that’s what makes it worth sharing.

Hi, I’m Madison Greene, the creator behind Texture Obsessed. If you have ever fallen in love with the crunch of a perfectly toasted crust, the silkiness of a smooth custard, or the contrast between crispy and creamy in a single bite, then you already understand what inspires me.

