There’s something about a DIY snack box that taps into pure nostalgia. It’s like assembling a little treasure chest of flavors—each component chosen with care, each bite a small celebration of customization. For me, it’s the kind of meal that turns an ordinary afternoon into a moment of joy, whether alone or with friends.
This Chicken Snack Box is my go-to when I want something comforting but also fun to put together. It’s not fancy, but it hits all the right notes—crispy, tender, zesty, and a little messy in the best way. Plus, it’s a perfect way to use up leftovers or prep ahead for busy days.
Focusing on the nostalgic comfort of a DIY snack box, emphasizing the joy of assembling and customizing each component for a personal, portable treat.
The story behind this recipe
- This recipe was born out of a lazy Sunday afternoon, when I had a handful of cooked chicken and a craving for something casual but satisfying. I wanted to create a snack that was portable, customizable, and reminded me of those little lunchboxes I used to pack as a kid—only elevated enough to feel like a treat.
- One day, I just started layering flavors—crispy chicken, tangy dips, crunchy sides—and before I knew it, I had a little feast that could be assembled in minutes. It’s become my go-to for picnics, quick dinners, or when I need a break from the usual sandwich. It’s simple, honest, and a bit messy, in all the best ways.
- heading: ‘The story behind this recipe’
Key ingredients and tips
- Boneless chicken thighs: I love how juicy and tender they get when cooked properly—just don’t overcook, or they’ll turn rubbery. Try marinating briefly for extra flavor if you have time.
- Pickles: Their tangy crunch cuts through the richness of the chicken—use your favorite type, but don’t skip the brine, it’s the secret to that vibrant punch.
- Creamy dip: I use a simple yogurt-based sauce with herbs—bright, cooling, and easy to tweak with lemon or garlic. If you want it richer, swap in sour cream.
- Crispy elements: Think toasted nuts or crunchy veggies—these add texture and freshness. Toast nuts until golden and smell that nutty aroma, then sprinkle generously.
- Carrot sticks: They bring a sweet, crisp bite—use heirloom carrots if you want extra color and flavor, but regular are fine. Keep them chilled for that satisfying crunch.
- Herbs and herbs: Fresh parsley or cilantro—they brighten everything. Snip right before serving, so they stay vibrant and fragrant in every bite.
- Seasoning: A dash of smoked paprika or sumac adds depth—don’t be shy with it, but keep it balanced so it doesn’t overpower the other flavors.
Spotlight on key ingredients
Boneless chicken thighs:
- I love how juicy and tender they get when cooked properly—just don’t overcook, or they’ll turn rubbery. Try marinating briefly for extra flavor if you have time.
- Pickles: Their tangy crunch cuts through the richness of the chicken—use your favorite type, but don’t skip the brine, it’s the secret to that vibrant punch.
- Creamy dip: I use a simple yogurt-based sauce with herbs—bright, cooling, and easy to tweak with lemon or garlic. If you want it richer, swap in sour cream.
Pickles:
- Their tangy crunch adds brightness and acidity, balancing the savory chicken—use any type you love, from dill to bread-and-butter.
- Creamy dip: It’s cool and tangy, with herbal freshness—perfect for dunking or drizzling. Adjust the herbs and lemon for your preferred zing.
- Herbs and herbs: Fresh parsley or cilantro—they brighten everything. Snip right before serving, so they stay vibrant and fragrant in every bite.
Notes for ingredient swaps
- Dairy-Free: Swap yogurt with coconut or almond-based alternatives. It may alter the tangy brightness but keeps things smooth and creamy.
- Gluten-Free: Use almond or rice flour instead of panko breadcrumbs. Expect a slightly different crunch, but the flavor stays satisfying.
- Low-Sodium: Choose unsalted pickles and reduce seasoning in the dip. The dish will be less salty but still flavorful with fresh herbs.
- Vegan: Replace chicken with tofu or tempeh, and use plant-based yogurt. The texture will be different, but the savory vibe remains.
- Vinegar Adjustments: Use apple cider or rice vinegar instead of lemon-bright pickles for a milder tang, or skip entirely if preferred.
- Crunch Element: Substitute toasted nuts with crispy chickpeas or roasted seaweed strips for extra texture and umami hit.
- Herb Variations: Swap parsley or cilantro for basil or mint to shift the freshness and aroma, adding a new twist.
Equipment & Tools
- Sharp knife: For cutting chicken into uniform pieces
- Mixing bowls: To marinate and coat chicken
- Shallow dish: For breadcrumb coating
- Large skillet: To cook chicken evenly
- Probe thermometer: To check internal temperature
- Wire rack: To drain and keep chicken crispy
Step-by-step guide to chicken snack box
- Gather all ingredients and equipment before starting — this keeps the process smooth. Preheat your oven to 200°C (390°F).
- Cut chicken into bite-sized pieces, about 2 cm (0.75 inch), and season with salt, pepper, and a pinch of smoked paprika. Toss well and set aside for 10 minutes.
- In a shallow dish, whisk together 1 cup of buttermilk and a teaspoon of hot sauce. Dip chicken pieces into the mixture, then coat with a mixture of panko breadcrumbs and a touch of garlic powder.
- Heat a large non-stick skillet over medium heat (about 150°C/300°F). Add a tablespoon of oil. Once shimmering, add chicken pieces in a single layer—don’t overcrowd. Cook for 4-5 minutes per side until golden and crispy.
- Check for doneness by inserting a probe thermometer into the thickest piece — it should read 75°C (165°F). The chicken should be juicy inside, with a crispy crust outside. If not, cook a minute longer.
- Remove chicken from skillet and let rest on a wire rack for 5 minutes to keep crisp. Meanwhile, prepare your side dips and arrange the snack box components.
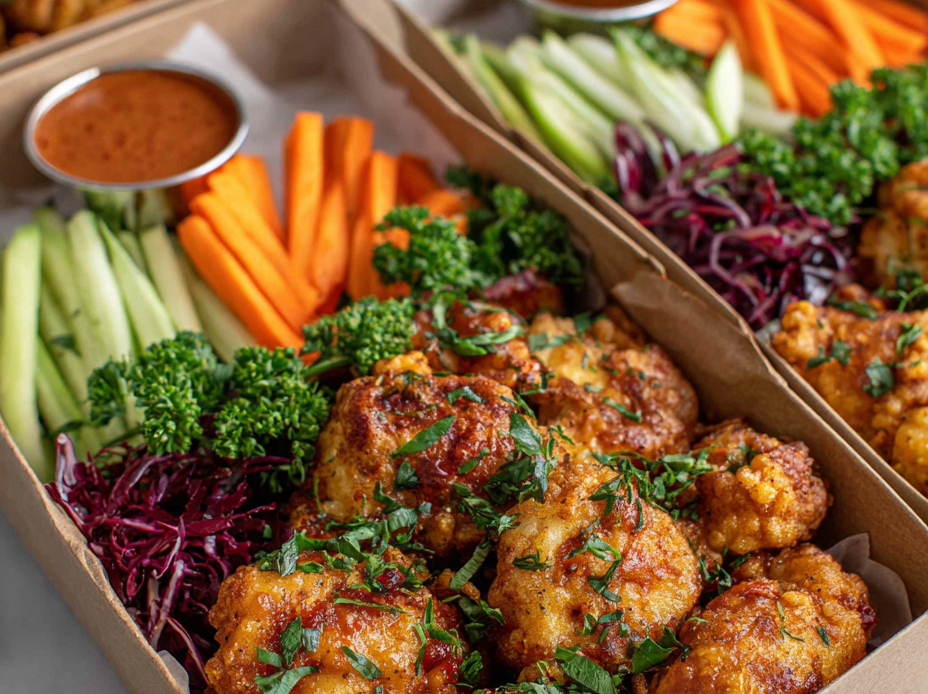
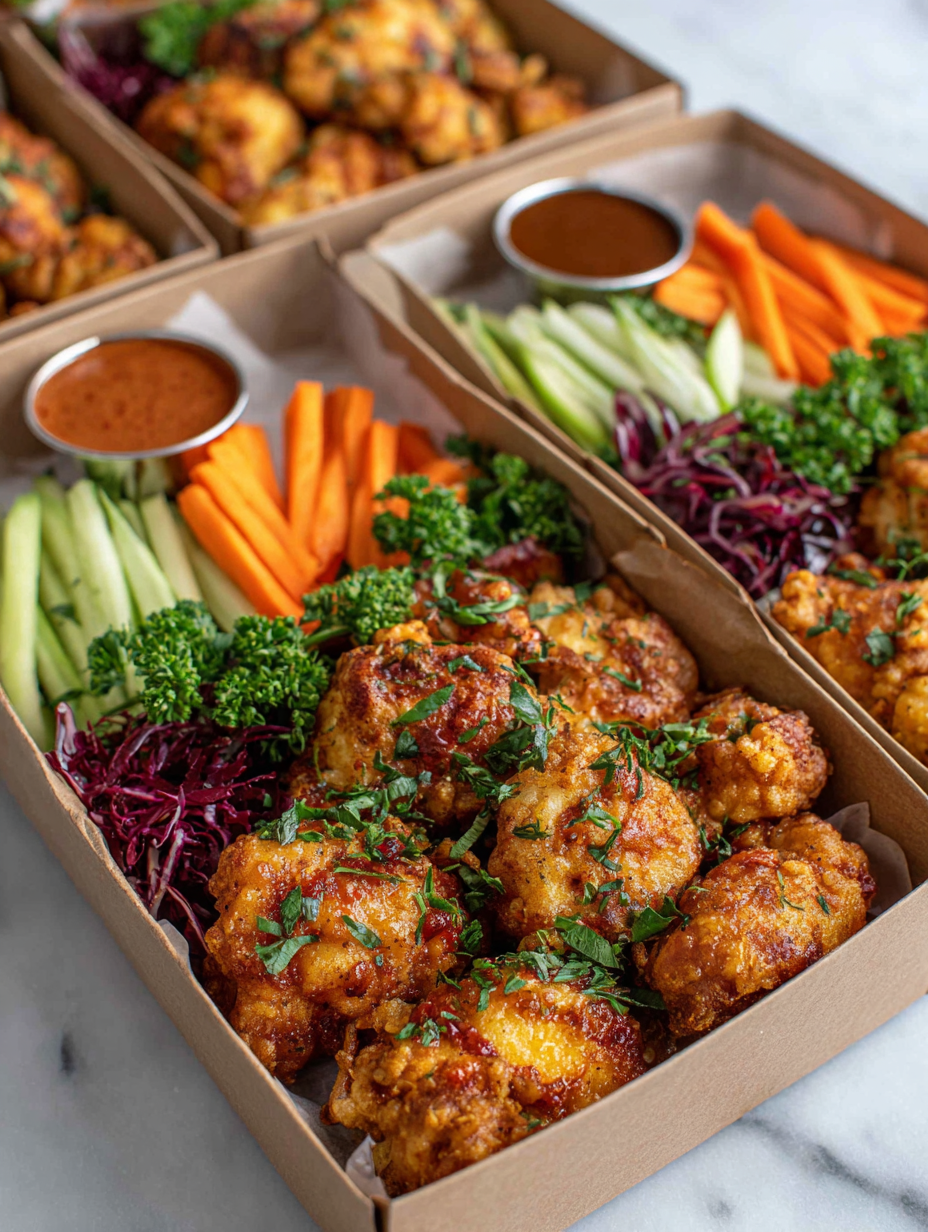
- Assemble your snack box with chicken, pickles, crunchy veggies, and herbs. Serve immediately while crispy and warm for the best experience.
Let the chicken rest on a wire rack for 5 minutes to maintain crispness. Arrange components in your snack box, layering flavors and textures. Serve immediately for maximum crunch and freshness.
How to Know It’s Done
- Chicken reaches 75°C (165°F) internally for safety and juiciness.
- Crust is golden brown and crispy, not pale or soggy.
- Chicken feels firm but tender when pressed, not rubbery or mushy.
Chicken Snack Box
Ingredients
Equipment
Method
- Start by preheating a large skillet over medium heat and gathering all your ingredients for a smooth workflow.
- Cut the chicken thighs into bite-sized pieces, about 2 cm across, and season lightly with salt, pepper, and a pinch of smoked paprika if you like.
- In a mixing bowl, whisk together the buttermilk and hot sauce to create a flavorful marinade for the chicken.
- Dip the chicken pieces into the buttermilk mixture, ensuring they are well coated, then transfer them to a shallow dish filled with panko breadcrumbs mixed with garlic powder.
- Heat a tablespoon of oil in your skillet until shimmering, then carefully place the coated chicken pieces in a single layer. Cook for about 4-5 minutes on each side until golden brown and crispy.
- Use a probe thermometer to check that the internal temperature reaches 75°C (165°F). Once done, transfer the chicken to a wire rack and let it rest for 5 minutes to maintain crispiness.
- While the chicken rests, prepare your accompaniments: slice the pickles, chop the herbs, and cut the carrots into sticks. Arrange everything in your snack box for a colorful presentation.
- Mix the yogurt with chopped herbs to make a bright, cooling dip. Taste and add lemon or garlic if desired for extra flavor.
- Layer the crispy chicken, tangy pickles, crunchy carrots, and herbs in your serving box, creating a vibrant, textured arrangement.
- Finish by drizzling some of the herb yogurt dip over the chicken or serve it on the side for dipping. Enjoy your colorful, satisfying snack box immediately while everything is crispy and fresh!
Pro Tips for Perfect Snack Box
- Use a gentle touch when coating chicken to keep the crispy crust intact.
- Preheat your skillet thoroughly; a shimmering surface means ideal crisping starts immediately.
- For extra juiciness, let the chicken rest uncovered for 2 minutes after cooking to settle the juices.
- When frying, keep oil at a consistent medium heat; too hot and the crust burns before the inside cooks.
- Add a splash of lemon juice to your dip right before serving for a fresh, zesty lift.
- Sprinkle herbs right before serving to keep their vibrant aroma sharp and lively.
- Use a probe thermometer to avoid overcooking — chicken should hit 75°C (165°F) for safe, juicy bites.
Common mistakes and how to fix them
- FORGOT to check chicken temperature → Use a probe for safe, juicy results.
- DUMPED too much oil in pan → Use a small amount, just enough to shimmer and crisp.
- OVER-TORCHED the chicken → Lower heat if it browns too quickly; aim for golden crust.
- MISSED resting time → Rest chicken 5 mins for maximum juiciness and crunch.
Quick Fixes and Pantry Swaps
- If chicken looks pale, splash a little lemon juice for brightness.
- When oil smokes, shield the pan and lower the heat immediately.
- Dumped too much oil? Patch with a paper towel and reduce heat.
- Over-torched the chicken? Rescue by lowering heat and adding a splash of water.
- When in doubt, swap panko for crushed cornflakes for added crunch.
Prep, store, and reheat tips
- Prep cooked chicken and cut into bite-sized pieces up to 2 days ahead; keep refrigerated in an airtight container for a fresh, juicy bite.
- Assemble components like dips, pickles, and crunchy veggies 1 day in advance; store separately to maintain crispness and brightness.
- Refrigerate assembled snack boxes for up to 24 hours, but best enjoyed fresh for maximum crunch and flavor contrast.
- Reheat chicken in a 180°C (350°F) oven for 10 minutes or until crispy again; check for bubbling and a warm aroma to confirm readiness.
- Avoid storing assembled boxes for more than 24 hours; textures soften, and freshness diminishes, especially for crispy elements.
Top questions about Chicken Snack Box
1. Can I use leftover cooked chicken?
Use cooked, shredded chicken for faster prep, or roast fresh thighs for juiciness and flavor.
2. Can I prepare this ahead of time?
Yes, just ensure it’s cooled fully and cut into bite-sized pieces for easy assembly.
3. How do I keep components crispy?
Keep crispy elements separate until serving to prevent sogginess, then assemble just before eating.
4. How do I reheat the chicken without losing crunch?
Reheat chicken in a 180°C (350°F) oven for about 10 minutes until warm and crispy again.
5. Can I make the dip dairy-free?
Use dairy-free yogurt or mayonnaise in the dip for a vegan or allergy-friendly version.
6. Can I substitute the breadcrumbs?
Yes, swap panko for crushed cornflakes or toasted nuts for different textures and flavors.
7. What if I don’t like pickles?
Pickles add a tangy, crunchy contrast. Use your favorite type, from dill to bread-and-butter.
8. Can I skip the herbs?
Add fresh herbs like parsley or cilantro just before serving to keep their vibrant aroma.
9. How do I know when the chicken is cooked properly?
Cook chicken until it reaches an internal temperature of 75°C (165°F) for safe, juicy bites.
10. Can I customize the flavors?
Adjust seasonings to taste—more lemon or herbs can brighten or mellow the overall flavor.
This Chicken Snack Box feels like a little act of rebellion—something casual but made with care. It’s perfect for those busy days when you want flavor and comfort without fuss. Plus, it’s a reminder that good food doesn’t have to be complicated, just honest and satisfying.
Once you get the hang of assembling this, it’s hard to go back. It’s a kind of messy joy—crunchy, juicy, tangy all in one bite—and that’s exactly what makes it worth making again and again.

Hi, I’m Madison Greene, the creator behind Texture Obsessed. If you have ever fallen in love with the crunch of a perfectly toasted crust, the silkiness of a smooth custard, or the contrast between crispy and creamy in a single bite, then you already understand what inspires me.

